BLOG
Night Out in Ulsan: Where 울산 풀사롱 Guides You

Ulsan isn’t just an industrial city—it also has a lively nightlife scene that attracts both locals and visitors looking for entertainment after dark. From karaoke bars to stylish lounges, there’s something for everyone.
For those interested in adult entertainment, websites like 울산 풀사롱 (ulsanfullsalon.org) offer guides and reviews of Ulsan’s top venues, including services from Korea, Thailand, and China. This makes it easier for visitors to plan a night out and find the best spots for karaoke, drinks, and socializing.
Top Nightlife Options in Ulsan
1. Karaoke Bars and Rooms
Karaoke is a staple of Ulsan’s evening entertainment. Private rooms allow groups to sing, relax, and enjoy drinks in a comfortable setting. Many venues provide themed rooms, high-quality sound systems, and a wide selection of songs in multiple languages.
2. Lounges and Bars
Ulsan has a variety of stylish bars and lounges where visitors can enjoy cocktails, socialize with friends, or meet locals. Happy hours and live music events make these spots perfect for a casual night out.
3. Entertainment Services
For those looking for a more specialized experience, some venues offer professional entertainment with hosts and performances. Websites like ulsanfullsalon.org provide detailed listings and reviews, helping visitors find trusted, high-quality venues.
Tips for Enjoying Ulsan’s Nightlife
- Plan ahead: Check online guides to find the best venues for your interests.
- Stay safe: Always go out with friends or in groups, and keep an eye on your belongings.
- Respect local customs: Understanding cultural etiquette ensures a smooth and enjoyable night.
- Try something new: Ulsan’s nightlife offers experiences you won’t find anywhere else, from unique karaoke setups to live performances.
Making the Most of Your Night Out
By planning your evening and using trusted resources, visitors can make the most of Ulsan’s vibrant nightlife. Whether it’s singing in a karaoke room, enjoying drinks at a lounge, or exploring adult entertainment venues, there’s plenty to see and do. Websites like 울산 풀사롱 (ulsanfullsalon.org) help navigate the city’s options so you can enjoy a memorable night in Ulsan.

Kuwait’s coffee scene has never been the same since Leet Coffee arrived on the scene. Combining third-wave specialty coffee culture with state-of-the-art vending technology, Leet Coffee is redefining how people in the Middle East experience their daily cup. Whether you are a busy professional at Ooredoo Tower or a coffee enthusiast looking for a convenient, affordable, and genuinely great brew, Leet Coffee delivers a fresh start one cup at a time.
What is Leet Coffee?
The Future of Vending in the Middle East
Leet Coffee is a Kuwaiti-born specialty coffee brand built on a simple but powerful manifesto: a fresh start for vending. Frustrated by the poor quality and impersonal nature of traditional vending machines, the brand set out to create an experience that rivals any boutique coffee shop at a fraction of the cost and with zero wait time.
Operating in Kuwait and expanding across the Middle East, Leet Coffee combines the latest machine technology with a deep understanding of local culture. The result is a brand that is as innovative as it is authentic.
Key brand pillars include: innovation through the latest technology, fresh-ground specialty coffee on demand, a user-friendly and intuitive interface, community and connection through storytelling, and a manifesto for a fresh start.
More Than Just a Machine: The Leet Experience
Leet Coffee is not a vending machine it is a coffee community. Every touchpoint, from the sleek visual language of the machine to the curated Spotify playlists you can enjoy while you wait, is designed to make you feel connected. The brand understands that coffee in Kuwait is more than a beverage; it is the social fabric that brings people together.
| “Leet Coffee is built on the belief that great coffee should be accessible to everyone fast, fresh, and without compromise.” |
The Leet Coffee Machine: Technology & User Guide
How to Use the Leet Vending Machine
Using a Leet Coffee machine is effortless. The interface is designed to be completely autonomous, so even first-time users can enjoy a perfect cup in seconds. Here is a simple step-by-step guide:
- Approach the machine and wake the touchscreen interface.
- Browse the available coffee selections using the intuitive digital menu.
- Select your preferred drink (e.g., Espresso, Americano, Latte).
- Choose your size and any customisation options.
- Tap to pay using your preferred payment method.
- Watch as your beans are ground fresh on demand in real time.
- Collect your cup and enjoy. The entire process takes under 60 seconds.
The machine’s autonomous design means there is no barista needed, no queue, and no wasted time. It is specialty coffee, reimagined for the modern world.
Coffee Varieties & Quality
Leet Coffee takes pride in offering a curated menu of specialty-grade drinks, each made with freshly ground, high-quality coffee beans. Current offerings include:
- Espresso rich, concentrated, and boldly aromatic.
- Americano smooth and balanced, perfect for an all-day drink.
- Latte velvety milk blended with a double shot of espresso.
- Cappuccino classic frothy Italian coffee, made fresh.
- Black Coffee straightforward, clean, and third-wave quality.
All beans are sourced and roasted with third-wave standards in mind, emphasising traceability, freshness, and complex flavour profiles. Because every cup is ground on demand, you are never drinking stale or pre-brewed coffee.
The Cultural Connection: Coffee in Kuwait
Arabic Coffee to Specialty Coffee
Coffee is not just a drink in Kuwait it is a cultural institution. From the ceremonial serving of qahwa (traditional Arabic coffee flavoured with cardamom and saffron) during negotiations and family gatherings, to the modern third-wave coffee shop, caffeine has always been at the heart of Kuwaiti social life.
In a country where alcohol is not consumed, coffee takes on an even greater social role. It is the beverage of hospitality, business, celebration, and daily ritual. The hot, humid climate has also shaped a culture of indoor socialising, making well-placed, high-quality coffee access points more valuable than ever.
Leet Coffee steps directly into this cultural narrative honouring tradition while embracing the pace and preferences of the modern Kuwaiti consumer. It bridges the gap between the beloved social ritual of coffee sharing and the demand for convenience and quality in a fast-moving world.
Machine Locations & Partnerships
Leet Coffee machines are currently deployed in premium, high-footfall locations across Kuwait. The flagship installation can be found at Ooredoo Tower, one of Kuwait City’s most prominent corporate addresses.
Current and upcoming locations include:
- Ooredoo Tower, Kuwait City (Flagship Location)
- Additional corporate office buildings across Kuwait City
- Premium residential and mixed-use developments
- University campuses and educational institutions
Are you a property manager, business owner, or office administrator? Bring Leet Coffee to your space. Contact the team to explore a placement partnership (see Section 6).
Why Choose Leet Coffee?
Benefits for Users
Choosing Leet Coffee over a traditional cafe or standard vending machine comes with a range of tangible advantages:
- Convenience: Available 24 hours a day, 7 days a week no opening or closing times.
- Quality: Third-wave specialty coffee, ground fresh for every single cup.
- Speed: From selection to cup in under 60 seconds. Zero queue.
- Autonomy: No interaction required the machine handles everything.
- Community: Curated playlists and a brand story that makes every coffee moment feel special.
- Affordability: Premium quality at a price significantly lower than a traditional specialty cafe.
Pricing & Payment
Leet Coffee is designed to deliver outstanding value without compromising on quality. Pricing is competitive and transparent, with drinks typically ranging from 0.500 KWD to 1.500 KWD depending on the selection and size.
Accepted payment methods include:
- KNET (Kuwait’s national debit card network)
- Visa and Mastercard credit and debit cards
- Contactless / NFC tap payments
- Apple Pay and Google Pay (where supported)
No cash handling is required, making the entire transaction fast, hygienic, and seamless.

Frequently Asked Questions
Q1. How does Leet Coffee work?
Leet Coffee machines are fully autonomous. Simply approach the touchscreen, choose your drink, pay using a card or contactless method, and watch your coffee beans ground fresh in real time. Your cup is ready in under 60 seconds with no human interaction required.
Q2. Where can I find Leet Coffee machines in Kuwait?
The flagship machine is located at Ooredoo Tower in Kuwait City. Additional machines are being rolled out across corporate buildings, residential complexes, and campuses throughout Kuwait. Check the official Leet Coffee social channels for the latest location updates.
Q3. What types of coffee does Leet offer?
Leet Coffee offers a curated menu including Espresso, Americano, Latte, Cappuccino, and Black Coffee. All drinks are made with freshly ground, specialty-grade beans.
Q4. How much does a cup of Leet Coffee cost?
Drinks typically range from 0.500 KWD to 1.500 KWD. This makes Leet Coffee significantly more affordable than visiting a specialty cafe, while maintaining the same standard of quality.
Q5. Is Leet Coffee high quality?
Absolutely. Leet Coffee uses third-wave specialty-grade beans that are ground fresh on demand for every single order. There is no pre-brewed batch coffee every cup is as fresh as it gets.
Partner with Leet: Bring Innovation to Your Location
Businesses & Offices
If you manage an office building, co-working space, university campus, residential tower, or any high-footfall location in Kuwait, a Leet Coffee machine could be the premium amenity your tenants and visitors have been waiting for.
Benefits of hosting a Leet Coffee machine include:
- Zero capital investment Leet handles the machine, installation, and maintenance.
- A premium employee or visitor perk that improves daily satisfaction.
- A passive revenue stream through a revenue-sharing arrangement.
- Enhanced brand image associate your location with innovation and quality.
- A low-overhead, high-impact F&B solution requiring no staffing from your side.
Getting started is simple. Reach out to the Leet Coffee partnerships team with your location details and enquiry. The team will assess placement feasibility and guide you through the setup process.
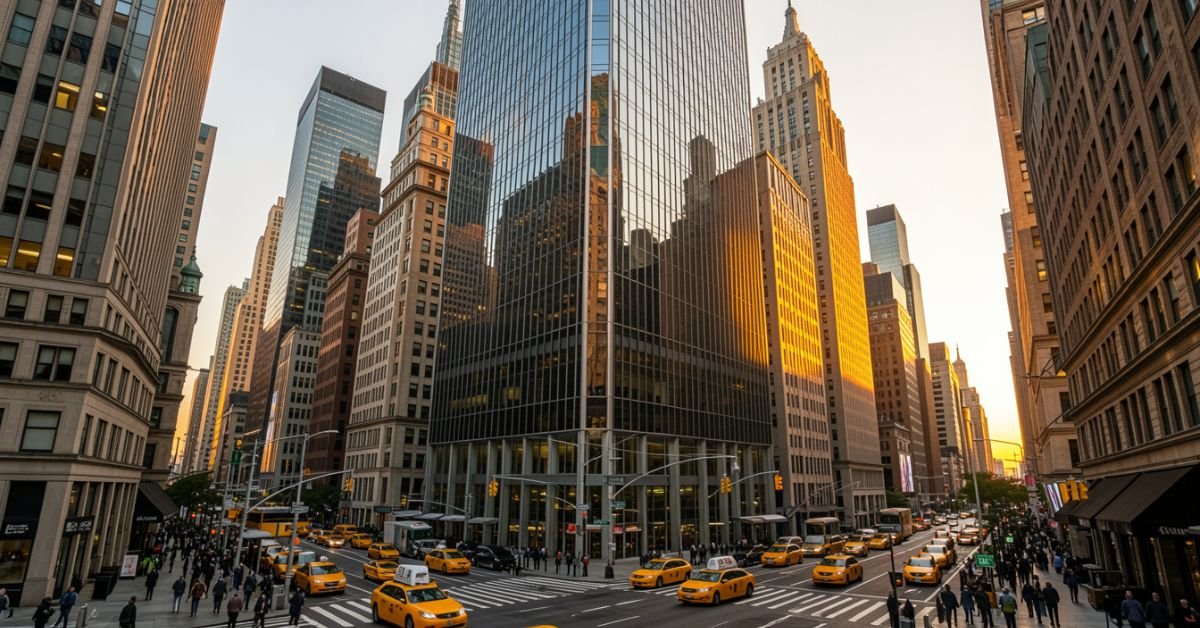
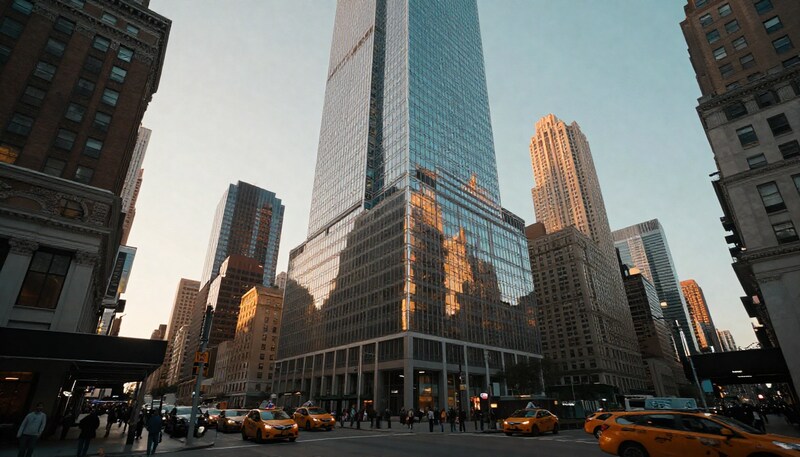
Rising 51 floors above Sixth Avenue in the heart of Midtown Manhattan, 1221 Avenue of the Americas stands as one of New York City’s most distinguished commercial addresses. Formerly known as the McGraw-Hill Building, this International Style skyscraper has anchored the skyline since its completion in 1969, serving as a landmark of architectural ambition and corporate prestige.
As part of the celebrated Rockefeller Center complex’s westward expansion, 1221 Avenue of the Americas forms one corner of the trio colloquially known as the “XYZ Buildings” alongside 1251 and 1211 Avenue of the Americas. Today, under the ownership of the Rockefeller Group and Mitsubishi Estate, the building continues to attract the world’s leading professional services firms, law firms, and media companies.
Key Facts at a Glance
| Attribute | Detail |
| Address | 1221 Avenue of the Americas, New York, NY 10020 |
| Former Name | McGraw-Hill Building |
| Height (Roof) | 674 feet (205 meters) |
| Floors | 51 stories |
| Gross Floor Area | 2.2 million square feet |
| Elevators | 36 |
| Construction Started | 1966 |
| Completed / Opened | 1969 / 1972 |
| Architect | Wallace Harrison (Harrison & Abramovitz) |
| Ownership | Rockefeller Group / Mitsubishi Estate |
| LEED Certification | 2009 (Green Building) |
Prime Midtown Location & Accessibility
Situated on Sixth Avenue between 47th and 48th Streets, 1221 Avenue of the Americas occupies one of the most strategically accessible addresses in New York City. Whether commuting by subway, bus, or on foot, tenants and visitors benefit from an unrivalled web of transportation options.
- Subway: B, D, F, and M lines stop directly at 47–50 Streets–Rockefeller Center station, located just steps from the building’s entrance.
- Grand Central Terminal: A short walk east provides access to Metro-North, the 4/5/6, 7, and S lines.
- Bus: Multiple MTA crosstown and express bus routes serve Sixth Avenue and the surrounding midtown grid.
- Ferry: The East River Ferry terminals at East 34th and East 44th Streets offer water transport options.
- Proximity: Rockefeller Center, Radio City Music Hall, and Bryant Park are all within a 5-minute walk.
Architectural Significance & Design by Wallace Harrison
Designed by the legendary architect Wallace K. Harrison of the firm Harrison & Abramovitz the same practice responsible for the United Nations Headquarters and Rockefeller Center itself 1221 Avenue of the Americas is a defining example of postwar International Style architecture applied at a monumental urban scale.
The building’s design philosophy prizes clarity, proportion, and material honesty. Its soaring cuboid massing asserts a powerful verticality, while its meticulous detailing at street level creates an inviting civic presence that softens the building’s sheer size.
The International Style & Red Granite Facade
The most immediately striking feature of 1221 Avenue of the Americas is its distinctive facade: bold piers of deep red granite alternate with recessed bands of glass, drawing the eye upward and reinforcing the building’s sense of height. This interplay of warm stone and reflective glass exemplifies the International Style’s capacity for elegance through restraint.
- Red granite piers: Sourced for their rich, warm tone, the vertical piers give the building its signature colour identity within the midtown streetscape.
- Glass stripes: Floor-to-ceiling glazing between piers maximises natural light on every floor plate.
- Seven-story base: A pronounced base element, clad in matching materials, grounds the tower and creates a human-scale transition to the street.
- Lobby finishes: The interior lobby features dark red terrazzo flooring and red marble wall panels, maintaining material continuity from exterior to interior. Inscribed aphorisms by Plato and President John F. Kennedy add a layer of intellectual and civic character.
The $50 Million Plaza Renovation
In 2023, the building’s ownership completed a landmark $50 million renovation of the ground-level public plaza and sunken courtyard one of the most significant upgrades to a midtown public space in recent years. The project reimagined the sunken plaza as an activated, all-season destination for tenants and the public alike.
- Improved retail: New food and beverage offerings were introduced at plaza level, creating a curated retail mix to serve the building’s thousands of daily occupants.
- Landscaping and seating: Enhanced greenery, lighting, and seating zones make the plaza a genuine amenity rather than a transitional space.
- The Sun Triangle (Athelstan Spilhaus): The plaza is home to a celebrated solar sculpture by scientist and artist Athelstan Spilhaus. Designed with precise astronomical intent, the Sun Triangle casts specific shadows aligned to the summer and winter solstices as well as the spring and autumn equinoxes a rare piece of functional public art embedded within a commercial environment.
- Accessibility: The renovation addressed ADA compliance and improved pedestrian circulation throughout the courtyard.
Inside 1221: Office Spaces, Tenants & Amenities
Beyond its iconic exterior, 1221 Avenue of the Americas delivers one of Midtown’s most sought-after office environments. Extensive floor plates, efficient column spacing, and a comprehensive suite of building amenities make it a preferred address for major global enterprises.
Flexible & Expansive Floor Plans
With 2.2 million square feet of gross floor area distributed across 51 stories, the building offers significant flexibility for tenants of all sizes. The generous floor plates among the largest available in the Sixth Avenue corridor allow for open-plan configurations, divisible suites, and fully customised fit-outs to meet the exacting standards of today’s professional occupiers.
- Column spacing is designed to maximise usable area and accommodate a wide range of furniture and partition layouts.
- Efficient building core placement reduces dead corridor space, increasing the ratio of usable to gross square footage.
- Full-floor and multi-floor leases are available, making the building suitable for both boutique professional practices and global headquarters operations.
Notable Tenants & Industry Presence
The tenant roster at 1221 Avenue of the Americas reads as a Who’s Who of global professional services, finance, law, and media. The building’s prestige and location continue to attract firms for whom address is a genuine business asset.
| Tenant | Sector |
| Deloitte (New York Practice) | Professional Services / Audit & Consulting |
| Sirius XM / The Howard Stern Show | Media & Broadcasting |
| Mayer Brown | Global Law Firm |
| White & Case | Global Law Firm |
| McGraw Hill Financial (former HQ) | Financial Information & Analytics |
| BusinessWeek (former) | Business Media / Publishing |
Tenant Experience & Building Amenities
The ownership and management team at 1221 Avenue of the Americas have invested consistently in the tenant experience, ensuring that the building’s physical environment keeps pace with the evolving expectations of world-class occupiers.
- Broadcast-grade facilities: The building hosts the Sirius XM broadcast studios, including the flagship home of The Howard Stern Show a first-of-its-kind broadcast facility integrated into a premier commercial tower.
- Lobby experience: The soaring lobby, dressed in red marble and terrazzo, creates a distinctive arrival sequence reinforced by engraved philosophical and presidential quotations.
- Building management: On-site property management ensures responsive maintenance, security, and operational support for all tenants.
- Security: 24/7 security personnel, surveillance systems, and controlled access protocols ensure a safe working environment.
- Retail: Ground-floor and plaza-level retail offers dining, financial services, and convenience options for building occupants.
A Storied History: From Construction to Pop Culture
The XYZ Buildings of Rockefeller Center
The original Rockefeller Center completed between 1930 and 1940 comprised 14 buildings between Fifth and Sixth Avenues. In the 1960s, the Rockefeller Group undertook a major westward expansion across Sixth Avenue, commissioning three towers that would become known informally as the XYZ Buildings, named after their respective positions in a planned sequence.
| Building | Address | Height | Floors | Completed |
| 1221 Avenue of the Americas (“Z”) | 1221 Sixth Avenue | 674 ft | 51 | 1969 |
| 1251 Avenue of the Americas (“X”) | 1251 Sixth Avenue | 750 ft | 54 | 1971 |
| 1211 Avenue of the Americas (“Y”) | 1211 Sixth Avenue | 699 ft | 50 | 1973 |
Together, the three towers defined a new architectural and commercial corridor on Sixth Avenue, transforming what had been an elevated railway line (the Sixth Avenue El, demolished in 1939) into one of Manhattan’s premier office addresses. Their consistent material palette and coordinated massing established a rare sense of urban coherence rarely achieved in speculative office development.
Filming Locations & Media Appearances
Beyond its role as a corporate address, 1221 Avenue of the Americas has earned a notable place in popular culture, lending its distinctive facade and interiors to some of the most recognisable productions in film and television.
- The Devil Wears Prada (2006): The building’s lobby and exterior featured prominently as the fictional headquarters of Runway magazine, cementing its association with high-fashion corporate glamour.
- Suits (USA Network): The legal drama utilised the building’s exterior and lobby as part of its signature New York visual identity.
- Saturday Night Live (NBC): The building appears in the long-running title sequence of SNL, one of the most-viewed opening credits in television history.
- Tony Hawk’s Pro Skater 2 (2000): The sunken plaza at 1221 Avenue of the Americas served as the real-world inspiration for one of the video game’s most celebrated skateboarding levels, introducing the building to a global gaming audience.
Safety, Operations & Modernisation
Modern Safety & Security Systems
Like all Class A commercial buildings in Manhattan, 1221 Avenue of the Americas operates under comprehensive safety and security protocols that have evolved substantially over the building’s more than five decades of operation.
- Elevator systems: The building’s 36 elevators have undergone ongoing modernisation to meet current safety codes, with regular inspection and maintenance schedules mandated by New York City law.
- Fire safety: Advanced sprinkler systems, smoke detection, and regularly tested evacuation procedures ensure compliance with New York City’s rigorous fire safety ordinances.
- Security: Access-controlled entry points, CCTV surveillance coverage of common areas, and 24/7 staffed security desks provide multiple layers of protection for tenants and visitors.
- Building management: A dedicated on-site operations team manages day-to-day mechanical, electrical, and plumbing systems, with direct lines to emergency response services.
Note: In 1999, a widely-documented elevator entrapment incident in which a building occupant was trapped for 41 hours drew national media attention and later became the subject of a New Yorker magazine investigation and viral video. In the years since, building management has implemented extensive upgrades to elevator monitoring and emergency communication systems.
LEED Certification & Sustainability
In 2009, 1221 Avenue of the Americas achieved LEED (Leadership in Energy and Environmental Design) certification from the U.S. Green Building Council a significant milestone for a building of its era and scale.
- Energy efficiency: LEED certification reflects the building’s investment in reduced energy consumption through upgraded HVAC systems, lighting controls, and building envelope improvements.
- Tenant benefits: Occupying a LEED-certified building supports tenants’ own corporate sustainability reporting and ESG commitments.
- Ongoing investment: The 2023 plaza renovation incorporated sustainable landscape design principles, further reinforcing the building’s environmental credentials.
Exploring the Neighbourhood: Points of Interest
One of the most compelling aspects of a tenancy at 1221 Avenue of the Americas is the extraordinary density of world-class amenities, cultural institutions, and transit infrastructure within immediate walking distance.
| Destination | Approximate Distance | Category |
| Rockefeller Center (30 Rock) | 2-minute walk | Culture / Architecture |
| Radio City Music Hall | 3-minute walk | Entertainment |
| Top of the Rock Observation Deck | 3-minute walk | Tourism / Views |
| Bryant Park | 5-minute walk | Parks & Recreation |
| The Museum of Modern Art (MoMA) | 5-minute walk | Art & Culture |
| Grand Central Terminal | 10-minute walk | Transit Hub |
| Times Square | 5-minute walk | Entertainment |
| Central Park (south entrance) | 10-minute walk | Parks & Nature |
Frequently Asked Questions
Q: What is the exact address of 1221 Avenue of the Americas?
A: The full mailing address is 1221 Avenue of the Americas, New York, NY 10020. The building is located on Sixth Avenue between West 47th and West 48th Streets in Midtown Manhattan.
Q: How tall is 1221 Avenue of the Americas?
A: The building rises 674 feet (approximately 205 metres) to its roof, across 51 floors. It is one of the taller office towers on the Sixth Avenue corridor.
Q: What companies are headquartered at 1221 Avenue of the Americas?
A: Major tenants include Deloitte’s New York practice, Sirius XM (including The Howard Stern Show studios), and leading global law firms Mayer Brown and White & Case. McGraw Hill Financial was formerly headquartered here.
Q: What is the history of the ‘McGraw-Hill Building’?
A: Construction began in 1966, and the building was completed in 1969. It was originally developed and named for McGraw-Hill, the publishing and financial data company, which used the building as its headquarters for many years. It opened to full occupancy in 1972.
Q: What subway lines are near 1221 Avenue of the Americas?
A: The closest subway station is 47–50 Streets–Rockefeller Center (B, D, F, M trains on the Sixth Avenue Line), located directly adjacent to the building. Grand Central–42nd Street is also within a short walk.
Q: Is the public plaza at 1221 Avenue of the Americas open to visitors?
A: Yes. The sunken courtyard and surrounding plaza are publicly accessible and were extensively renovated in 2023 at a cost of $50 million. The plaza features retail, seating, and the Sun Triangle sculpture by Athelstan Spilhaus.
Q: What movies and TV shows were filmed at 1221 Avenue of the Americas?
A: Notable productions include The Devil Wears Prada (2006), Suits (USA Network), and the Saturday Night Live (NBC) title sequence. The building’s plaza also inspired a level in the video game Tony Hawk’s Pro Skater 2.
Q: Did the famous 1999 elevator incident happen in this building?
A: Yes. In 1999, a building employee was trapped in an elevator for approximately 41 hours. The incident was later documented in The New Yorker and became widely shared after surveillance footage was released online. Since then, the building has undertaken significant modernisation of its elevator monitoring and emergency communication systems.
Q: Who owns 1221 Avenue of the Americas?
A: The building is owned by the Rockefeller Group and Mitsubishi Estate. In 2016, a stake valued at approximately $1 billion was sold to the China Investment Corporation (CIC), implying an overall valuation of approximately $2.3 billion at the time.
SimpCity is a controversial online forum operating primarily under domains such as SimpCity.su and SimpCity.cr that has gained significant notoriety for hosting and distributing adult content without the consent of the original creators. This article provides a complete overview of what SimpCity is, how it functions, the serious legal and personal risks it poses, and what affected creators can do to protect themselves. Whether you are a curious reader, a concerned content creator, or someone seeking safer and more ethical alternatives, this guide covers everything you need to know.
What is SimpCity? A Closer Look at the Controversial Forum
More Than Just a Forum: Its Primary Purpose
At its surface, SimpCity presents itself as a user-driven discussion forum and video-sharing community. In reality, its primary purpose is the unauthorized sharing and archiving of adult content sourced from paid subscription platforms. The forum operates as a hub for leaked content material that has been taken from platforms like OnlyFans, Fansly, and Patreon and made freely available without the permission of the creators who originally produced it. Community members contribute links, upload files, and fulfill one another’s requests for specific content, creating a self-sustaining ecosystem built on digital piracy.
The Name and Its Connection to Internet Culture
The name “SimpCity” is a play on internet slang. The term “simp” is used colloquially to describe someone who is excessively devoted to another person often a content creator to the point of financial generosity. The forum’s name ironically inverts this idea: rather than paying creators they admire, users seek to obtain their content for free. It is worth noting that “SimpCity” is entirely distinct from the classic city-building video game franchise “SimCity,” and should not be confused with it.
The Core Function: How SimpCity Operates
A User-Driven Content Model
SimpCity is entirely user-driven. Members post threads requesting specific content from particular creators, while other members respond by uploading or linking to the material. This model of community curation and archiving means the forum does not necessarily host all content on its own servers links and uploads are contributed by thousands of individual users, making the operation highly decentralized and difficult to fully shut down.
The Focus on Premium Platforms
The forum’s primary targets are premium, subscription-based content platforms. These include OnlyFans, Fansly, Patreon, and similar paid content sites. The core appeal for users is paywall circumvention accessing content that creators have placed behind a subscription fee, entirely for free. This directly undermines the economic model that independent content creators rely upon.
The Significant Dangers and Ethical Problems of SimpCity
The Legal Reality: Piracy and Copyright Infringement
Using, contributing to, or even visiting SimpCity carries real legal implications. The platform’s core activity distributing paid content without authorization constitutes copyright infringement and digital piracy, which is illegal in most countries. Users who upload content are directly violating copyright law. Even those who simply download material may expose themselves to legal liability. Key legal facts to understand:
- Unauthorized distribution of copyrighted material violates laws in the US, UK, EU, Canada, and most other jurisdictions.
- Copyright holders have successfully sued individuals for distributing or downloading pirated content.
- Platforms hosting pirated content can be subject to DMCA takedowns and legal injunctions.
The Human Cost: Impact on Content Creators
Behind every piece of content shared on SimpCity is a real person whose livelihood and consent have been violated. The impact on creators is severe and multifaceted:
- Financial harm: Lost subscription revenue and stolen earnings directly reduce creators’ income, causing financial instability.
- Devaluation of work: When paid content is freely available, creators lose the ability to set a fair price for their labor.
- Violation of consent: Intimate content being shared without permission is deeply violating and can cause significant emotional distress.
- Reputational damage: Content shared out of context can be harmful to a creator’s personal and professional life.
Serious Security Risks for Users
Beyond legal risk, anyone who visits SimpCity exposes themselves to significant cybersecurity threats. The site is known for intrusive and malicious advertisements, as well as links that may lead to phishing sites or malware downloads. Specific risks include:
- Malware: Executable files disguised as content downloads.
- Phishing: Fake login pages designed to steal credentials.
- Adware and spyware: Installed silently via drive-by downloads from aggressive ad networks.
- Data theft: Personal and financial information can be compromised.
How to Protect Yourself If You Encounter Such Sites
- Use a reputable ad-blocker browser extension (e.g., uBlock Origin).
- Never download files from unverified sources.
- Keep your antivirus software up to date and run regular scans.
- Use a VPN to protect your network identity and browsing data.
- If you suspect your device is infected, run a full system scan immediately and change your passwords.
Why the .su Domain is a Red Flag
The .su country-code top-level domain was originally assigned to the Soviet Union and has never been decommissioned. Today it is frequently used by websites operating in legal gray areas, because .su domains are managed by a Russian registrar that is less responsive to Western legal demands, such as DMCA takedown requests. This makes it significantly harder for copyright holders to pursue legal remedies against sites using .su domains. The frequent domain changes from .su to .cr and beyond further reflect deliberate evasion of legal accountability.
The Instability Problem: Why is SimpCity Always Down?
Users of SimpCity frequently encounter downtime and domain changes. This instability is not accidental it is the direct result of sustained legal pressure. Hosting providers regularly drop the site upon receiving copyright complaints. Domains are seized or flagged, forcing the operators to migrate to new addresses. Server overload from high traffic volumes also contributes to frequent outages. Any specific domain currently associated with SimpCity should be considered potentially temporary, as the site’s history shows a consistent pattern of domain hopping to evade enforcement.
What to Do If Your Content is on SimpCity: A Guide for Creators
If you discover that your content has been posted on SimpCity without your consent, take the following steps immediately and methodically.
Document the Infringement
Before taking any action, document the evidence. Take detailed screenshots of the infringing posts, including URLs, usernames of those who posted it, timestamps, and the content itself. Save these records securely you will need them for any formal legal process.
File a Formal DMCA Takedown Notice
A DMCA (Digital Millennium Copyright Act) takedown notice is a formal legal request demanding the removal of infringing content. You should file this with the site’s hosting provider (which can be identified using WHOIS lookup tools), the domain registrar, and any content delivery networks involved. DMCA takedown templates are freely available online from organizations such as the Electronic Frontier Foundation (EFF). Alternatively, services like Dmca.com can automate the filing process for a fee.
Report Directly to Source Platforms
If the leak originated from a subscription platform such as OnlyFans or Fansly, report the breach directly to their support and legal teams. Most major platforms have dedicated processes for copyright infringement reports and can assist in identifying the account responsible for the initial leak.

Seek Professional Legal Advice
For persistent infringement, or if you want to pursue legal action against individuals responsible, consult an attorney who specializes in copyright law and digital rights. A legal professional can guide you through potential civil or criminal remedies and help you understand your jurisdiction’s specific protections.
SimpCity Alternatives: Safer and More Ethical Options
Community and Discussion (Without Piracy)
If you are interested in the community and discussion aspects of forums like SimpCity without engaging in piracy, Reddit hosts numerous communities dedicated to adult content discussion that operate within platform rules and respect creator rights. Many creators also host their own Discord communities where fans can interact directly.
Supporting Creators Directly and Ethically
The most ethical and sustainable alternative is to support creators directly through official channels. Subscribing on platforms such as OnlyFans, Fansly, or Patreon ensures that creators are fairly compensated for their work. Benefits of direct support include:
- Guaranteed access to the content you want, legally and securely.
- The ability to interact directly with creators, often receiving personalized content.
- The satisfaction of supporting independent creators’ livelihoods and artistic work.
Free, Legal Adult Content
Many content creators offer free sample content on their official pages to attract new subscribers. Additionally, numerous legitimate, ad-supported tube sites host verified uploads from creators who have chosen to distribute their content for free. These platforms ensure that content is shared only with the creator’s consent, making them a legally and ethically sound alternative.
Frequently Asked Questions About SimpCity
| Question | Answer |
| What is SimpCity.su / SimpCity.cr? | SimpCity is a user-driven online forum known primarily for distributing leaked adult content from paid subscription platforms like OnlyFans and Fansly without creator consent. |
| Is SimpCity legal? | No. The site hosts pirated content, which constitutes copyright infringement and is illegal in most countries. |
| Is it safe to visit SimpCity? | No. The site poses significant security risks including malware, phishing attempts, and intrusive/malicious advertisements. |
| Why is SimpCity always down or not working? | Frequent downtime results from legal pressure, hosting providers dropping the site, domain seizures, and server overload from high traffic. |
| What are the best SimpCity alternatives? | Official platforms like OnlyFans, Fansly, and Patreon for supporting creators; Reddit communities for discussion; and ad-supported tube sites for free legal content. |
| How do I remove my content from SimpCity? | Document the infringement, file a DMCA takedown notice with the hosting provider, report to source platforms, and consult a copyright attorney if necessary. |
| Does SimpCity harm content creators? | Yes. It directly steals their earnings, devalues their work, violates their consent, and can cause significant financial and emotional harm. |
| What does the .su domain mean? | The .su domain was originally assigned to the Soviet Union. It is still active and often used by sites operating in legal gray areas, as enforcement of DMCA requests against .su domains is difficult. |
Conclusion
SimpCity represents a broader problem in the digital content ecosystem: the ease with which piracy can harm independent creators. While the platform presents itself as a community space, its core function is the systematic theft and redistribution of creators’ work without consent or compensation. The legal risks to users, the security dangers of the site, and the devastating impact on creators all point to the same conclusion: SimpCity is not a safe, ethical, or sustainable alternative to simply supporting the creators whose work you enjoy. By choosing to subscribe to official platforms and engage with ethical content communities, you help sustain an online environment where creators can thrive.
-

 ENTERTAINMENT9 months ago
Tesla Trip Planner: Your Ultimate Route and Charging Guide
-
 TECHNOLOGY9 months ago
FaceTime Alternatives: How to Video Chat on Android
-

 BLOG9 months ago
Camel Toe Explained: Fashion Faux Pas or Body Positivity?
-

 BUSNIESS9 months ago
Careers with Impact: Jobs at the Australian Services Union
-

 FASHION8 months ago
Wrist Wonders: Handcrafted Bracelet Boutique
-

 BLOG8 months ago
Jalalabad India: A Hidden Gem of Punjab’s Heartland
-

 ENTERTAINMENT8 months ago
Centennial Park Taylor Swift: Where Lyrics and Nashville Dreams Meet
-

 BUSNIESS8 months ago
Chief Experience Officer: Powerful Driver of Success