
BLOG
Copywriting for Beginners: Your Ultimate Guide to Start & Succeed in 2026

Copywriting for Beginners Copywriting is the craft of writing text (called “copy”) designed to persuade readers to take a specific action. Unlike general writing that aims to inform or entertain, copywriting has a clear goal: to sell a product, generate leads, build brand awareness, or inspire clicks.
From email subject lines to billboard headlines, from product descriptions to social media ads, copywriting is everywhere. It’s the invisible force behind marketing that turns casual browsers into engaged customers.
Copywriting vs. Content Writing: Key Differences
While the terms are often confused, copywriting and content writing serve different purposes:
| Aspect | Copywriting | Content Writing |
|---|---|---|
| Primary Goal | Drive immediate action (buy, click, sign up) | Educate, inform, or entertain |
| Tone | Persuasive, urgent, benefits-focused | Informative, conversational, educational |
| Length | Usually short and punchy | Can be long-form (blogs, articles, guides) |
| Examples | Ads, sales pages, email campaigns, CTAs | Blog posts, how-to guides, case studies |
| Measurement | Conversion rates, click-through rates, sales | Traffic, engagement, time on page |
Both skills are valuable, and many professionals do both. But copywriting specifically focuses on conversion and persuasion.
Why Learn Copywriting? High Demand & Career Flexibility
The digital economy runs on words that convert. Businesses of all sizes need copywriters to help them connect with customers and drive sales. According to recent industry reports, demand for skilled copywriters continues to grow as companies expand their digital presence.
As a copywriter, you can choose your path: work as a freelancer with location independence and flexible hours, or join a company’s marketing team for stability and benefits. You can specialize in industries you’re passionate about, from tech startups to healthcare to e-commerce. The skills are transferable, the work is creative, and the income potential is strong.
The 6 Foundational Skills Every Beginner Copywriter Needs
Before you write your first sales page, you need to build a solid foundation. Here are the core skills that separate amateur copy from professional, conversion-driving work:
Skill 1: Strong, Clear Writing & Grammar
Great copy starts with clarity. You don’t need to be a literary genius, but you do need to express ideas cleanly and correctly. Poor grammar undermines credibility, and confusing sentences lose readers.
Focus on writing in simple, direct sentences. Avoid jargon unless your audience expects it. Read your work aloud to catch awkward phrasing. Tools like Grammarly can help, but developing your own editorial eye is crucial.
Skill 2: Customer & Market Research Insight
The best copywriters are obsessed with understanding their audience. Who are you writing for? What keeps them up at night? What are their desires, frustrations, and objections?
Before writing a single word, dig into customer reviews, browse forums where your audience hangs out, study competitor messaging, and if possible, talk directly to potential customers. The insights you gather become the raw material for persuasive copy.
Skill 3: Translating Features into Compelling Benefits
This is where beginners often stumble. Features describe what a product is or does. Benefits explain why that matters to the customer.
Feature: “Our app has a built-in timer.”
Benefit: “Stay on track and boost productivity without switching between apps.”
Customers don’t buy features—they buy better versions of themselves. Train yourself to always ask: “So what? Why does this matter to the reader?” That’s your benefit.
Skill 4: Mastering Classic Formulas (AIDA, PAS, BAB)
You don’t have to reinvent the wheel. Proven copywriting formulas give you a structure to follow, especially when you’re starting out.
AIDA is the most famous:
- Attention: Grab the reader with a compelling headline
- Interest: Build curiosity with relevant details
- Desire: Show them why they need this
- Action: Tell them exactly what to do next
Example:
- Attention: “Tired of wasting hours on admin tasks?”
- Interest: “Our automation software handles invoicing, scheduling, and follow-ups in one place.”
- Desire: “Imagine reclaiming 10+ hours every week to focus on what you love.”
- Action: “Start your free trial today—no credit card required.”
Other useful formulas include PAS (Problem-Agitate-Solution) and BAB (Before-After-Bridge). Learn these patterns, and you’ll always have a starting point.
Skill 5: Headline & Hook Crafting
Your headline is the most important sentence you’ll write. If it doesn’t grab attention, nothing else matters because readers won’t stick around.
Great headlines promise a clear benefit, create curiosity, or tap into an emotion. They’re specific, not vague. Compare:
- Weak: “Improve Your Productivity”
- Strong: “How I Doubled My Output in 30 Days Without Working Longer Hours”
Practice writing 10-20 headlines for every piece of copy. Study what works in your niche. Swipe files (collections of effective headlines) become invaluable.

Skill 6: Adapting to Different Brand Voices
A playful DTC brand sounds different from a corporate law firm. As a copywriter, you’ll need to match the tone and style of each client or project.
Study brand guidelines when available. Read existing content to internalize the voice. Ask yourself: Is this brand formal or casual? Friendly or authoritative? Witty or straightforward? Your copy should feel like a natural extension of the brand, not a jarring shift.
Your First 7 Steps: From Learning to First Client
Ready to go from beginner to paid copywriter? Here’s your action plan:
Step 1: Immerse Yourself in Learning
Start by consuming high-quality copywriting education. You don’t need expensive courses right away—plenty of free resources exist.
Recommended books:
- “The Copywriter’s Handbook” by Robert Bly (timeless fundamentals)
- “Made to Stick” by Chip and Dan Heath (how ideas stick)
- “Influence” by Robert Cialdini (psychology of persuasion)
Top blogs:
- Copyblogger (content marketing and copywriting)
- Copyhackers (conversion-focused copy)
YouTube channels:
- Search for channels dedicated to direct response copywriting and marketing fundamentals
Spend 2-4 weeks absorbing the basics. Take notes on formulas, strategies, and examples that resonate.
Step 2: Practice Relentlessly with Exercises
Knowledge without practice is useless. Start flexing your copywriting muscles daily.
Practice exercises:
- Rewrite ads: Find 5 ads you see online and rewrite them. What would make them stronger?
- Use prompts: “Write an email subject line for a productivity app” or “Create a product description for eco-friendly water bottles”
- Copy by hand: Take proven sales letters and copy them word-for-word. This trains your brain to recognize effective patterns
Set a goal of writing for 30 minutes daily. The repetition builds instinct.
Step 3: Find Your Starter Niche & Services
While you can be a generalist, starting with a focus helps you stand out and learn faster. Consider:
Popular niches:
- E-commerce (product descriptions, email campaigns)
- SaaS/Tech (landing pages, onboarding emails)
- Health & Wellness (blog posts, sales pages)
- Real Estate (listings, newsletters)
Common services beginners offer:
- Email copywriting
- Social media captions
- Website copy (About pages, service descriptions)
- Blog posts with SEO keywords
- Product descriptions
Choose something that interests you or where you have existing knowledge. You’ll write better copy when you understand the audience.
Step 4: Build a “No-Experience” Portfolio
Here’s the secret: you don’t need clients to have a portfolio. You create spec work—mock projects that showcase your skills.
How to create 3-5 portfolio samples:
- Pick real companies you admire (preferably smaller ones without perfect copy)
- Identify a specific project: “Email welcome sequence for X brand” or “Landing page for Y product”
- Write it as if you were hired: Include context (brief, target audience, goals)
- Present it professionally: Use Google Docs or simple PDFs with clean formatting
Examples:
- A 5-email welcome sequence for a fictional meal kit service
- A landing page for an existing app that you’ve rewritten
- Social media ads for a local business (even if they didn’t hire you)
Label these clearly as “spec work” or “concept project” to maintain integrity. What matters is demonstrating your skill.
Step 5: Craft Your Elevator Pitch & Personal Brand
When someone asks, “What do you do?” you need a clear answer.
Framework: “I help [target audience] [achieve specific result] through [your skill/service].”
Example: “I help e-commerce brands increase sales through conversion-focused email campaigns and product descriptions.”
Create a simple online presence:
- A LinkedIn profile highlighting your copywriting focus
- Optional: A basic website or portfolio page (free tools like Google Sites work fine)
- A professional email address
You don’t need to be fancy. You need to be findable and credible.
Step 6: Strategically Network to Find Clients
“Tell your friends and family” is common advice, but it’s rarely enough. Here’s how to proactively find opportunities:
Networking strategies:
- Join online communities: Reddit (r/copywriting, r/freelance), Facebook groups for copywriters and entrepreneurs
- Engage on LinkedIn: Comment thoughtfully on posts from potential clients, share copywriting insights
- Cold outreach: Identify 10 small businesses with weak website copy, send a personalized email offering a free rewrite of one page
- Freelance platforms: Upwork, Fiverr, and Freelancer can help you land early gigs (expect lower rates initially)
The goal isn’t to spam—it’s to build genuine relationships and demonstrate value.
Step 7: Price Your Services & Land the First Project
Pricing is intimidating for beginners, but here’s a practical approach:
Beginner rates:
- Hourly: $25-50/hour (while learning)
- Project-based: $100-300 for small projects (email sequence, landing page)
- Retainer: $500-1,000/month for ongoing work (5-10 hours)
Start lower to gain experience and testimonials, then raise rates as you improve. Don’t work for free unless it’s for a nonprofit you care about or a major brand that’ll make an impressive portfolio piece.
Landing your first client:
- Reach out to 20 potential clients (cold email, warm connections, freelance platforms)
- Offer a clear, specific service (“I’ll write your welcome email sequence”)
- Show proof (portfolio samples, even if they’re spec work)
- Make it easy to say yes (clear pricing, simple process)
It only takes one client to become a “real” copywriter. Stay persistent.
Choosing Your Path: Freelance vs. In-House Copywriting
Once you’ve built foundational skills, you’ll face a choice: go freelance or join a team?
The Freelance Copywriter: Freedom & Hustle
Pros:
- Work from anywhere with flexible hours
- Choose your clients and projects
- Higher income potential (you set rates)
- Variety of industries and challenges
Cons:
- Inconsistent income, especially starting out
- You handle everything: sales, client management, accounting
- No benefits (health insurance, paid time off)
- Can feel isolating without a team
How to start:
- Build your portfolio (spec work is fine)
- Set up a simple business (sole proprietorship works initially)
- Create systems for client onboarding, invoicing, and project management
- Market yourself consistently
Freelancing suits self-starters who value autonomy and don’t mind the hustle.
The In-House Copywriter: Stability & Specialization
Pros:
- Steady paycheck and benefits
- Team collaboration and mentorship
- Deep expertise in one brand/industry
- Clear career progression
Cons:
- Less variety (you’ll write for one brand repeatedly)
- Fixed hours and location (though remote is increasingly common)
- Income ceiling (raises are incremental)
- Office politics and approval processes
How to get hired:
- Tailor your resume to highlight writing and marketing skills
- Include portfolio samples relevant to the industry
- Learn the company’s brand voice before interviewing
- Consider entry-level marketing roles to break in
In-house roles suit those who prefer structure, teamwork, and gradual career growth.
Popular Copywriting Niches & Specializations
As you gain experience, specializing can increase your value and rates:
- Email copywriting: Welcome sequences, promotional campaigns, newsletters
- Direct response: Sales letters, VSLs (video sales letters), long-form landing pages
- SEO copywriting: Blog posts, website content optimized for search engines
- Social media copy: Captions, ads, engagement posts
- Technical copywriting: SaaS products, B2B tech, whitepapers
- E-commerce: Product descriptions, category pages, abandoned cart emails
You can also specialize by industry (healthcare, finance, real estate) or by outcome (conversion rate optimization, brand storytelling).
Modern Copywriting: Using AI Tools Ethically (2026 Update)
Artificial intelligence has transformed the copywriting landscape. Tools like ChatGPT, Jasper, and Copy.ai can generate draft copy in seconds. Does this mean copywriters are obsolete?
Not at all—but it does mean the role is evolving.
AI as a Brainstorming & Drafting Partner
Smart copywriters use AI to:
- Generate headline options: Get 20 variations in seconds, then refine the best ones
- Overcome writer’s block: Use AI to draft an outline or rough first pass
- Research faster: Summarize competitor copy or gather information quickly
- A/B test ideas: Create multiple versions to see what resonates
AI excels at producing volume and variety. It’s a productivity multiplier, not a replacement.
The Irreplaceable Human Touch: Editing & Strategy
Here’s what AI can’t do (yet):
- Understand nuanced brand voice: AI copy often sounds generic without heavy editing
- Conduct deep audience research: Insight comes from conversations, reviews, and empathy
- Make strategic decisions: What should you write about? What’s the right offer? What objections matter most?
- Edit for persuasion: AI drafts are starting points; skilled copywriters refine for maximum impact
The future belongs to copywriters who leverage AI for efficiency while adding the strategic thinking, emotional intelligence, and brand expertise that only humans provide.
Embrace AI as a tool. Your value is in what you do with it.
Essential Copywriting Tools & Resources to Get Started
You don’t need a huge budget to start copywriting. Here are the essentials:
Free Tools
- Google Docs: Writing and collaboration
- Grammarly (free version): Grammar and clarity checks
- CoSchedule Headline Analyzer: Rate your headlines (free online tool)
- Hemingway Editor: Simplify and strengthen your writing
- Answer the Public: Find questions your audience is asking
Learning Resources
Books:
- “Everybody Writes” by Ann Handley
- “Cashvertising” by Drew Eric Whitman
- Classic sales letters (Gary Halbert, David Ogilvy)
Blogs & Communities:
- Copyblogger
- Copyhackers
- r/copywriting on Reddit
Courses (optional):
- AWAI’s Accelerated Program for Six-Figure Copywriting
- Copyhackers’ 10x Emails course
- YouTube channels (many offer free crash courses)
Community
Joining a community accelerates learning. Look for:
- Copy Posse Collective
- Copywriting groups on Facebook and LinkedIn
- Local marketing meetups or writer groups
Learning from peers, getting feedback, and staying motivated becomes easier when you’re not going alone.
Frequently Asked Questions
What exactly does a copywriter do all day?
A copywriter’s day varies based on whether they’re freelance or in-house. Typically, you’ll spend time researching audiences and competitors, writing copy (emails, ads, web pages), editing drafts, collaborating with designers or marketers, and refining based on feedback or performance data. Freelancers also handle client communication and business tasks.
Can I become a copywriter with no degree or experience?
Absolutely. Copywriting is a skills-based field. While a degree in marketing, English, or communications can help, many successful copywriters are self-taught. What matters is your ability to write persuasively, understand audiences, and deliver results. Build a portfolio with spec work, practice consistently, and you can break in.
How much can a beginner freelance copywriter charge?
Beginners typically charge $25-50/hour or $100-300 per small project (like an email sequence or landing page). As you gain experience and results, you can raise rates significantly. Experienced copywriters often charge $100-200+/hour or $1,000-5,000+ per project depending on complexity and industry.
What’s the fastest way to build a portfolio with zero clients?
Create spec work: write copy for real companies as if they hired you. Choose 3-5 projects (email sequences, landing pages, ads) for brands you admire, write them professionally, and present them in a simple portfolio. Label them as concept work or spec projects. This demonstrates your skill without needing paid clients first.
What’s the difference between a niche and a specialization?
A niche refers to the industry or audience you serve (e.g., SaaS companies, fitness brands, real estate). A specialization refers to the type of copy you write (e.g., email campaigns, SEO blog posts, sales pages). You might niche down to “email copywriting for e-commerce brands”—combining both for maximum focus.
Is learning AI copywriting tools necessary now?
Not required, but highly beneficial. AI tools like ChatGPT and Jasper can speed up research, brainstorming, and drafting. However, human copywriters still provide strategic thinking, brand voice refinement, and persuasion expertise that AI lacks. Learn to use AI as a productivity tool, not a crutch, and you’ll stay competitive.
How do I know if my copy is good?
Good copy achieves its goal—whether that’s clicks, conversions, or engagement. In the beginning, focus on clarity, strong benefits, and clear calls-to-action. Get feedback from other copywriters or your target audience. As you gain clients, track performance: did your email get opened? Did the landing page convert? Data tells the truth.
Start Your Copywriting Journey Today
Becoming a copywriter doesn’t require a special degree, expensive courses, or years of preparation. It requires curiosity, consistent practice, and a willingness to learn from every piece of copy you write.

EroThots (primarily at domains like erothots.co, erothots1.com, or erothots.is) is a free adult tube-style site specializing in leaked and aggregated content from OnlyFans, Fansly, Reddit, and similar subscription platforms. It hosts videos, images, gifs, and clips featuring OnlyFans models, pornstars, and amateur creators. In 2026, with OnlyFans still dominant and piracy concerns growing, sites like this remain popular for zero-cost access but come with real trade-offs in quality, legality, and security.
We’ll walk through what the platform offers, how it operates, the types of content, privacy and legal realities, comparisons to official sources, common myths, and practical advice. No judgment, just clear details so you can decide for yourself.
What Is EroThots?
EroThots functions as a large aggregator and hosting site for adult material that originates elsewhere. Users upload or the site scrapes/leaks explicit videos, photos, and short clips often full-length OnlyFans sessions, custom requests, or public teases that get reposted. It emphasizes “leaked” content from popular creators, with categories covering everything from solo performances to hardcore scenes.
The site keeps things simple: search by model name, keyword (e.g., “onlyfans girls,” specific performers), or tags. No mandatory account for basic browsing, though ads and pop-ups are common. It includes sections for videos, image albums, and sometimes gifs or AI-generated porn teasers.
Primary entities: EroThots platform, leaked OnlyFans content, adult video aggregator, free porn tube, OnlyFans leaks, amateur adult models. Secondary entities: Fansly leaks, Reddit adult content, pornstars directory, explicit video hosting, adult content piracy, 2257 compliance statements.
Related keywords and long-tail terms: erothots.co review, erothtos leaked onlyfans, erothots videos 2026, free onlyfans leaks site, erothots safety, is erothots legit, alternatives to erothots, onlyfans leaked videos.
How EroThots Works and What You’ll Find
The platform operates like many free adult tubes: content gets indexed or mirrored quickly after it appears on paid services. Popular searches pull up high-view clips from trending creators, with thumbnails, durations, and basic metadata. Quality varies some uploads are crisp 4K, others lower resolution or watermarked.
Bullet-proof list of typical content types:
- Full or partial OnlyFans videos (solo, boy/girl, fetish)
- Photo sets and albums from subscription pages
- Short clips and gifs for quick viewing
- Leaked custom content or “PPV” (pay-per-view) material
- Occasional live stream recordings or Reddit-sourced posts
Navigation relies on search and category browsing. The site claims 2257 compliance (U.S. record-keeping for adult performers) and has report functions, but enforcement on piracy remains limited.
Safety, Legality, and Practical Concerns in 2026
Browsing EroThots exposes you to heavy advertising, potential malware risks from pop-ups, and trackers. While some trust checkers rate the main domains as “likely safe” for basic access, adult sites in general carry higher chances of redirects or unwanted downloads. Use ad blockers, updated browsers, and avoid clicking suspicious links.
Legally, the core issue is unauthorized distribution. Much of the “leaked” material violates creators’ copyrights and terms of service on OnlyFans and similar platforms. Downloading or sharing can lead to account bans, legal notices, or worse in extreme cases. Creators frequently complain about their paid work appearing free elsewhere, hurting their income.
Comparison Table: EroThots vs Official Subscription Platforms
| Aspect | EroThots (Free Leaks) | OnlyFans / Fansly (Paid) |
|---|---|---|
| Cost | Free | Subscription or PPV fees |
| Content Freshness | Often delayed or partial leaks | Immediate, full access for subscribers |
| Quality & Completeness | Variable, sometimes edited or low-res | Creator-controlled, higher consistency |
| Creator Support | None (harms earnings) | Direct revenue for models |
| Safety & Privacy | Higher ad/malware risk, tracking | Better controls, but still platform data collection |
| Legal/Ethical | Piracy concerns | Authorized, consensual |
Paid platforms win on ethics and reliability; free aggregators win on zero upfront cost but lose on everything else.
Myth vs Fact
Myth: Everything on EroThots is completely free and safe to download. Fact: “Free” often means ad-supported with risks, and downloads can include malware or expose your device. Plus, the content itself may be stolen.
Myth: Leaked OnlyFans sites like EroThots don’t hurt creators. Fact: They directly cut into subscription revenue. Many models report lost income and increased harassment when private content leaks.
Myth: These sites are official partners or mirrors of OnlyFans. Fact: They have no affiliation. OnlyFans actively fights leaks and can ban accounts involved in distribution.
Myth: Using an ad blocker makes EroThots risk-free. Fact: It reduces some dangers but doesn’t eliminate tracking, potential zero-day exploits, or the legal gray area of consuming pirated material.
Statistical Proof and Broader Context
Adult content consumption stays massive, with free tube sites and leak aggregators drawing tens of millions of monthly visitors. EroThots variants reportedly pull significant U.S. traffic. Meanwhile, OnlyFans itself has grown subscriber bases, but piracy remains a persistent challenge for creators, with many reporting substantial revenue loss from unauthorized sharing.
AI-generated adult content has also surged, and some leak sites now mix in or promote it alongside real leaks.
EEAT Reinforcement: Insights from Observing Adult Content Trends
Having followed the adult industry and digital content platforms through shifts from tube sites to subscription models and now AI influences, one lesson repeats: the “free” options almost always come with hidden costs whether lost creator income, security headaches, or lower satisfaction over time. A common mistake? Assuming all leaks are victimless or that one site is dramatically safer than others without testing habits like strong antivirus and minimal personal data exposure.
EroThots fits the classic aggregator mold: convenient for casual browsing but rarely the best long-term choice. Real-world experience shows that supporting creators directly often yields better content, community, and peace of mind. No single site review replaces your own risk assessment check recent user feedback on forums, use VPNs if privacy matters, and remember that platforms evolve (domains shift, content gets removed).
FAQs
What is EroThots exactly?
EroThots is a free adult website that aggregates and hosts leaked videos, photos, and clips primarily from OnlyFans and similar subscription services. It allows browsing explicit content without payment, focusing on amateur models and pornstars.
Is EroThots safe to use?
It carries typical risks of free adult sites: intrusive ads, potential malware from pop-ups, and tracking. Some checkers rate the domains as low-to-medium risk, but using ad blockers, antivirus, and avoiding downloads improves safety. Never enter personal info.
Is using EroThots legal?
Consuming leaked content often involves copyrighted material distributed without permission, raising legal and ethical issues. While prosecution for viewers is rare, it violates platform terms and harms creators. Stick to authorized sources for fewer worries.
Does EroThots have official OnlyFans content?
It specializes in unauthorized leaks and reposts. Official OnlyFans material is only available through paid subscriptions on the actual platform.
What are good alternatives to EroThots?
Paid options like OnlyFans, Fansly, or ManyVids give direct creator support and full access. For free legal content, try mainstream tubes with original uploads or creator teasers. For ethical free viewing, seek public social media posts from models.
Why do people search for “erothtos”?
It’s a common misspelling or shorthand for EroThots when looking for free leaked OnlyFans videos and adult images. High search volume reflects demand for no-cost explicit material.
Conclusion
EroThots revolves around key entities: leaked OnlyFans and amateur adult content, free video and image aggregation, piracy-driven adult tubes, creator impacts, and the ongoing tension between free access and paid platforms.
The adult content landscape in 2026 keeps shifting with stronger creator tools, AI generation, and crackdowns on unauthorized sharing. What doesn’t change is the value of informed choices balancing convenience against real risks and ethics.

Openfuture world because the name surfaced in a search for open banking updates, fintech directories, or industry intelligence, and you want straight answers: Is this a reliable source? What does it actually offer? And does it help cut through the noise in a fast-moving sector?
Your deeper need is practical finding a centralized place to track real progress in open banking and open finance without wading through hype, scattered news, or outdated lists. OpenFuture.World (openfuture.world) positions itself as the largest global source of information on advancements in open banking and beyond. In 2026, with open finance expanding rapidly across regions like Europe, the UK, Brazil, and Asia, having one hub for directories, curated news, and connections feels increasingly valuable.
What Is OpenFuture.World?
OpenFuture.World serves as a dedicated knowledge hub and directory focused on open banking, open finance, and related innovations. It aggregates and curates information to help users discover companies, track news, find events, and connect with peers in the sector.
Unlike a single fintech product or bank API, it functions as an intelligence platform. It highlights “who’s who” and “what’s worth paying attention to” through free resources: a searchable business directory with thousands of entries, daily news curation, articles, presentations, and event listings.
The site emphasizes progress in secure data sharing, third-party provider integration, and innovative financial services enabled by open standards. It covers both regulated entities and emerging players, making it useful for developers, banks, fintech founders, and analysts.
Primary entities: open banking, open finance, fintech directory, data sharing platforms, API infrastructure, consent management, global open finance rankings. Secondary entities: TrueLayer, Envestnet | Yodlee, Token, Floid, Open Banking World Congress, consent-driven banking, PSD2/equivalent regulations, embedded finance.
Related keywords and long-tail terms: openfuture.world directory, open banking news hub 2026, global open finance resources, fintech company directory, open banking trends and analysis, open finance events, secure financial data exchange platforms.
Core Features and How It Works
The platform stands out for its focused, no-frills approach to sector intelligence:
- Business Directory: A searchable database of organizations involved in open banking and finance. Entries include profiles on companies like TrueLayer (financial infrastructure), Envestnet | Yodlee (data aggregation), and Token (banking-enabled commerce). Users browse or search for prospects, partners, or competitive intelligence.
- Curated News and Articles: Daily or regular updates on developments, from regulatory shifts to new product launches and cybersecurity lessons.
- Events and Congress: Listings and details for gatherings like the Open Banking World Congress, designed for efficient networking and insights.
- Rankings and Analysis: Periodic global or thematic rankings that spotlight leading organizations, countries, and individuals driving progress.
Bullet-proof list of practical uses:
- Quickly find and evaluate potential partners or vendors in open banking APIs.
- Stay updated on cross-border developments without following dozens of sources.
- Discover emerging players in data analytics, consent management, or embedded finance.
- Prepare for events or pitches with background on key companies.
- Track broader themes like AI agents in payments or blockchain for consent.
The content tone leans professional and forward-looking, aimed at industry insiders who need actionable intelligence rather than consumer-facing explanations.
Open Banking and Open Finance Context in 2026
Open banking enables secure sharing of financial data with authorized third parties via APIs, with user consent at the center. Open finance extends this to insurance, investments, pensions, and more. In 2026, adoption varies: Brazil leads with high consumer uptake tied to instant payments, while Europe and the UK refine post-PSD2 frameworks, and other regions build foundational infrastructure.
OpenFuture.World tracks this uneven global progress, highlighting successes in personalized services, competition that benefits consumers, and challenges around trust, security, and interoperability.
Comparison Table: OpenFuture.World
| Aspect | OpenFuture.World | General News Sites (e.g., Finextra, TechCrunch) | Broader Directories (e.g., Crunchbase) |
|---|---|---|---|
| Focus | Deep open banking & open finance | Broad fintech and tech | All startups and funding |
| Directory Depth | Specialized profiles and links | Limited or none | Wide but less sector-specific |
| Content Style | Curated, analytical | Fast-breaking news | Company data and metrics |
| Free Access | Strong emphasis on free resources | Often ad-supported or paywalled | Basic free, premium for details |
| Best For | Industry professionals and researchers | General awareness | Investment scouting |
This hub shines when you need targeted, sector-specific depth rather than volume.
Myth vs Fact
Myth: OpenFuture.World is a fintech platform or bank service where you can directly access open banking APIs. Fact: It is an information and discovery hub, not a technical infrastructure provider. Use it to learn about and connect with actual API builders like TrueLayer or Yodlee.
Myth: All open banking directories are basically the same. Fact: Specialization matters. OpenFuture.World emphasizes global progress, rankings, and curated insights tailored to open finance, which sets it apart from generic startup lists.
Myth: Open finance is only relevant in Europe due to PSD2. Fact: Momentum is global. Regions like Brazil show strong consumer adoption, and many markets are implementing or expanding similar frameworks in 2026.
Myth: These hubs just republish press releases with no real value. Fact: Quality curation and targeted directories save significant research time, especially when tracking thousands of organizations across borders.
Statistical Proof and Market Context
Open finance continues expanding. Consumer willingness to share data for better experiences remains high, with reports indicating significant potential shifts in financial services value. Cybersecurity incidents in fintech stayed prominent in 2025, underscoring the need for robust consent and security practices that many directory-listed companies address.
Directories like this help navigate a landscape with thousands of players, from established data aggregators to innovative consent management solutions using blockchain or AI.
EEAT Reinforcement: Insights from Following Fintech Intelligence Platforms
Having tracked open banking developments since the early PSD2 days through multiple regulatory cycles and regional rollouts, one pattern stands clear: professionals who succeed fastest combine technical knowledge with strong ecosystem awareness. A common mistake? Relying solely on broad news feeds and missing nuanced, sector-specific signals on who is actually shipping usable infrastructure.
OpenFuture.World fills that gap with its focused directory and curation. It isn’t perfect no single hub captures every development but its emphasis on free access and global scope makes it a solid starting point. From evaluating similar resources over the years, the most useful ones prioritize transparency (clear about being informational, not advisory) and freshness. Always cross-reference directory entries with official company sites and recent regulatory filings for the fullest picture.
FAQs
What exactly is OpenFuture.World?
OpenFuture.World is a global knowledge hub and directory dedicated to open banking and open finance. It offers a searchable database of companies, curated news, articles, event information, and rankings to help professionals track progress and make connections in the sector.
Is OpenFuture.World an official platform or a news site?
It functions primarily as an independent information hub rather than an official regulatory body or technical API platform. It curates content and maintains a directory to support discovery and learning across the open finance ecosystem.
What can I find in the OpenFuture.World directory?
You’ll discover profiles of fintech companies, data aggregators, API providers, and other organizations involved in open banking. Examples include TrueLayer, Envestnet | Yodlee, and Token, with details to help identify potential partners or understand market players.
How does OpenFuture.World help with open banking trends in 2026?
It surfaces daily news, analysis, and events focused on data sharing, consent management, regulatory updates, and innovations like AI in payments. This keeps users informed on global developments without needing to monitor dozens of separate sources.
Is the content on OpenFuture.World free to access?
Yes, the platform emphasizes free resources including the directory, news, and basic event information. This approach aims to lower barriers for discovering and engaging with the open finance community.
Who should use OpenFuture.World?
Fintech professionals, bank innovation teams, developers building financial applications, analysts, and anyone needing reliable intelligence on open banking and open finance advancements benefit most from its focused resources.
Conclusion
OpenFuture.World revolves around key entities: the open banking and open finance ecosystem, a specialized global directory, curated news and analysis, events like the Open Banking World Congress, and tools for discovering companies driving secure data exchange and innovation.
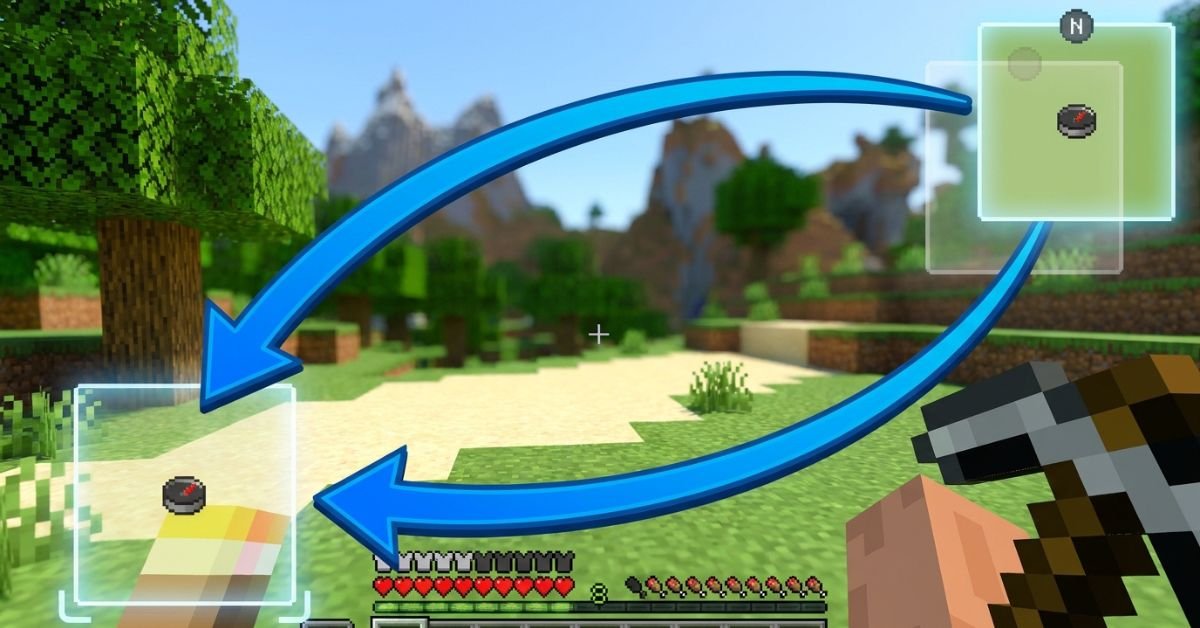
JourneyMap minimap sits stubbornly in the top right, blocking your hotbar or clashing with other HUD mods, and you just want it moved without breaking anything.
JourneyMap remains one of the most popular and powerful minimap mods for Minecraft Java Edition. It gives you a live radar-style minimap, full-screen mapping, waypoints, cave mapping, and deep customization. In 2026, with Minecraft 1.21+ and newer Fabric/Forge versions, the minimap positioning system is more flexible than ever, including true custom dragging.
Understanding JourneyMap’s Minimap System
JourneyMap displays a small, real-time map in one corner of your screen by default (usually top right). It shows terrain, mobs, players, waypoints, and info like coordinates or biome.
The mod supports two independent minimap presets. Each preset can have its own position, style (square/circular), zoom, displayed elements, and opacity. Switch between them instantly with a single keypress.
Key hotkeys you’ll use often:
- J Open full-screen map (and access settings from there)
- Ctrl + J Toggle minimap visibility
- ** (backslash) Switch between minimap presets
- = / – Zoom minimap in/out
- [ Cycle map types (terrain, cave, etc.)
Position options include: Top Right, Bottom Right, Bottom Left, Top Left, Top Center, Center, and Custom.
Step-by-Step: How to Change Minimap Position
Method 1: Quick Preset Changes (Easiest for Most Players)
- Press J to open the full-screen map.
- Click the Settings icon (gear) at the bottom, or press O.
- Navigate to Minimap (or Minimap Preset 1 / Preset 2).
- Find the Position dropdown.
- Choose from Top Right, Bottom Right, Bottom Left, Top Left, Top Center, or Center.
- Close the menu changes apply immediately.
You can configure Preset 1 and Preset 2 differently, then switch live with the ** key. This lets you have one clean minimap for exploration and another packed with info for building or PvP.
Method 2: True Custom Position (Drag Anywhere)
- Open full-screen map with J → Settings.
- Set Position to Custom.
- Return to the game world.
- Hold the configured move key (or use arrow keys) to drag the minimap freely.
- Fine-tune with the Minimap Key Move Pixel Offset setting (default 0.001) for precise pixel-level control.
Custom mode gives you pixel-perfect placement anywhere on screen perfect when other mods clutter the corners.
Method 3: In-Game Adjustments and Hotkeys
Some players prefer direct controls:
- Open settings via full-screen map for full access.
- Adjust related options like opacity, shape, info slots, and what displays (waypoints, players, mobs, light level, etc.).
Pro tip: After moving, test in different situations underground caves, dense forests, or with shaders active because render layers can shift slightly.
Comparison: Position Options in JourneyMap (2026)
| Position Option | Best For | Flexibility | Easy to Switch? | Notes |
|---|---|---|---|---|
| Top Right (Default) | Standard clean HUD | Low | Yes | Classic placement, rarely overlaps hotbar |
| Bottom Right | When top is crowded | Low | Yes | Good with action bars on left |
| Bottom Left | Players who read left-to-right | Low | Yes | Common with inventory-focused mods |
| Top Left | Minimal interference | Low | Yes | Avoid if you have chat or notifications |
| Top Center / Center | Dramatic or centered builds | Medium | Yes | Can feel intrusive during combat |
| Custom | Perfect personal HUD | Highest | Moderate | Drag freely + pixel offset tuning |
Custom wins for most experienced players once you spend five minutes setting it up.
Myth vs Fact
Myth: You can only put the minimap in the four corners. Fact: JourneyMap supports Top Center, Center, and full Custom drag mode for anywhere on screen.
Myth: Changing position requires editing config files manually. Fact: Everything is done in-game through the settings menu or hotkeys no file editing needed in recent versions.
Myth: The minimap resets position every time you restart Minecraft. Fact: Settings save per world/profile as long as you close the game properly.
Myth: Custom position only works with certain Minecraft versions. Fact: As of 2026 versions (1.21+), Custom drag and presets work reliably on Fabric, Forge, and NeoForge.
Real-World Insights From Years of Modded Play
After running JourneyMap in hundreds of modpacks across different Minecraft versions from 1.16 through 1.21+, the biggest mistake I see is players fighting the default top-right position instead of using the two presets properly. One preset for a minimal radar during exploration, another fully loaded for base building or resource hunting switching with feels like night and day.
Another common issue: conflicts with shader packs or other HUD mods (like AppleSkin or inventory tweaks). Setting Position to Custom and nudging it a few pixels usually solves overlap instantly. In 2025–2026 testing, the in-game settings menu has become even more responsive, with changes applying without needing a relog.
FAQs
How do I move the JourneyMap minimap to a different corner?
Press J to open the full map, click Settings (or press O), go to Minimap settings, and change the Position dropdown to Bottom Right, Top Left, or any preset option. Changes apply live.
Can I drag the JourneyMap minimap anywhere on screen?
Yes. Set Position to Custom in the settings menu, then use arrow keys or the move control to drag it freely. Adjust the pixel offset for finer control.
How do I switch between two different minimap presets?
The default key is ** (backslash). Configure Preset 1 and Preset 2 separately with different positions, sizes, or displayed info, then switch on the fly.
Why can’t I move my JourneyMap minimap?
Make sure you’re not in a conflicting mod setup (like certain VR mods). Try setting Position to Custom, or check that the minimap isn’t disabled. Restarting the game or updating JourneyMap often fixes stubborn cases.
Does changing minimap position affect performance?
Position changes are purely visual and have zero impact on FPS. Adjust opacity or disable heavy features (like high-quality cave mapping) if you need performance gains instead.
Is there a way to completely hide or disable the minimap?
Yes use Ctrl + J to toggle it off quickly, or turn off “Show Minimap” in the settings for a permanent change.
Conclusion
Changing the minimap position in JourneyMap comes down to understanding presets, the Position dropdown, and Custom drag mode. The core entities minimap presets, position options (corners + custom), hotkeys like J and , and in-game settings menu give you full control over how the mod fits your playstyle.
-

 ENTERTAINMENT12 months ago
Tesla Trip Planner: Your Ultimate Route and Charging Guide
-

 TECHNOLOGY12 months ago
FaceTime Alternatives: How to Video Chat on Android
-

 BLOG12 months ago
Camel Toe Explained: Fashion Faux Pas or Body Positivity?
-

 BUSNIESS12 months ago
Careers with Impact: Jobs at the Australian Services Union
-

 BLOG11 months ago
Jalalabad India: A Hidden Gem of Punjab’s Heartland
-

 FASHION11 months ago
Wrist Wonders: Handcrafted Bracelet Boutique
-

 ENTERTAINMENT11 months ago
Centennial Park Taylor Swift: Where Lyrics and Nashville Dreams Meet
-

 BUSNIESS11 months ago
Chief Experience Officer: Powerful Driver of Success