
BLOG
Unstoppable Drive: 7 Powerful Baseball Motivational Quotes to Crush Doubt

baseball motivational quotes to fire up your team, inspire your child, or even push yourself through a tough inning in life, you’re not alone. We all crave that spark, that one line that makes us believe we can swing for the fences, no matter how many times we’ve struck out before.
But what makes a quote truly motivational? Is it the wisdom of a legendary coach, the raw honesty of a journeyman player, or the timeless cliches that echo through dugouts everywhere? In this deep dive, we’ll explore the best baseball motivational quotes, real-life stories, and the hidden power behind the words that keep players and fans coming back for more.
Why Baseball Motivational Quotes Matter
Baseball is a game of failure. Even the best hitters miss seven out of ten times. That’s why baseball encouragement sayings and inspirational baseball quotes aren’t just nice-to-haves—they’re essential. They remind us that every strikeout is a setup for the next home run, and every error is a lesson in disguise.
Whether you’re a coach looking to rally your team, a parent supporting your little leaguer, or a player grinding through the minors, the right words can change everything. Let’s dig into the quotes, stories, and wisdom that make baseball more than just a sport.
The Power of Baseball Journeyman Quotes
Not every player becomes a superstar. Some spend years bouncing between teams, fighting for a spot on the roster. These are the baseball journeyman quotes—the gritty, real-life reminders that persistence pays off.
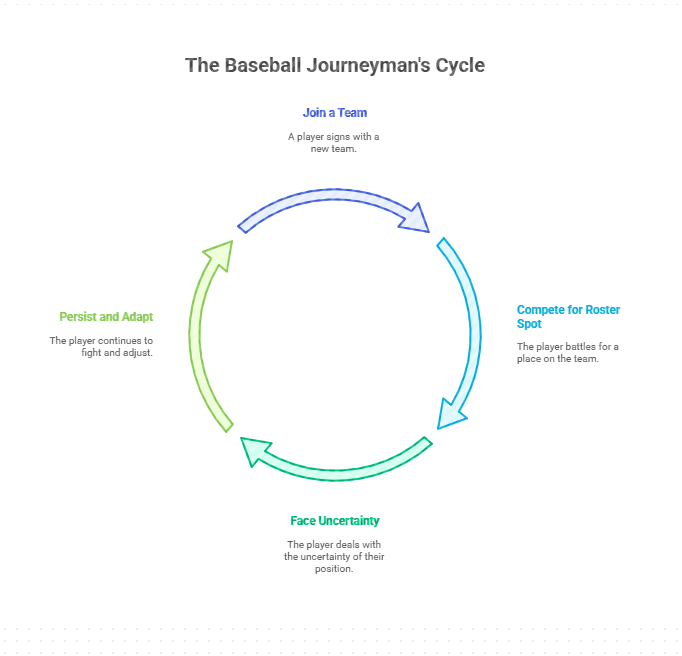
“I wasn’t the fastest, the strongest, or the most talented. But I showed up every day, ready to work. That’s what kept me in the game.”
This isn’t just a quote—it’s a mindset. Journeymen know the value of hard work, humility, and never giving up. Their stories inspire us because they’re relatable. Most of us aren’t prodigies, but we can all choose to show up and give our best.
Real-Life Example: The Relentless Utility Player
Consider the story of Chris, a utility infielder who spent a decade in the minors before finally getting his shot in the big leagues. He wasn’t a household name, but his teammates respected his work ethic and positive attitude. When asked about his journey, Chris said:
“Every bus ride, every cold night in a motel, every time I was sent down—I just kept telling myself, ‘One more day. One more chance.’ That’s what baseball is all about.”
His journey is proof that baseball motivational quotes aren’t just words—they’re lived experiences.
Best Baseball Cliches and Idioms About Life
Baseball is full of cliches, but there’s a reason they stick around. The best baseball cliches and idioms about life capture universal truths in simple, memorable phrases.
- “Keep your eye on the ball.”
Focus on what matters, block out distractions. - “It ain’t over till it’s over.”
Never give up, no matter the score. - “Step up to the plate.”
Take responsibility and face challenges head-on. - “Swing for the fences.”
Don’t be afraid to take risks and go big. - “Play ball!”
Sometimes, you just have to start.
These sayings aren’t just for the diamond—they’re life lessons in disguise. They remind us to stay focused, persevere, and seize every opportunity.
Baseball Encouragement Sayings for Every Player
Everyone needs a boost now and then. Whether you’re in a slump or riding high, these baseball encouragement sayings can help you stay grounded and motivated.
- “Every strike brings me closer to the next home run.” – Babe Ruth
Failure is part of the process. - “You miss 100% of the pitches you don’t swing at.”
Take chances, even if you might fail. - “The difference between a successful person and others is not a lack of strength, not a lack of knowledge, but rather a lack in will.” – Vince Lombardi
Willpower matters more than talent. - “Baseball is ninety percent mental and the other half is physical.” – Yogi Berra
Mindset is everything. - “Don’t let the fear of striking out keep you from playing the game.”
Courage over comfort.
These sayings are perfect for locker room speeches, pre-game pep talks, or even a quick text to a friend who needs a lift.
Inspirational Baseball Quotes from Legends
The greats of the game have a way with words. Their inspirational baseball quotes have motivated generations of players and fans.
- “Never let the fear of striking out get in your way.” – Babe Ruth
- “It’s hard to beat a person who never gives up.” – Babe Ruth
- “There may be people that have more talent than you, but there’s no excuse for anyone to work harder than you do.” – Derek Jeter
- “Every day is a new opportunity. You can build on yesterday’s success or put its failures behind and start over again.” – Bob Feller
- “Love is the most important thing in the world, but baseball is pretty good, too.” – Yogi Berra
These quotes aren’t just about baseball—they’re about life, resilience, and the pursuit of greatness.
Inspirational Sports Quotes Baseball Fans Love
Baseball isn’t the only sport with powerful quotes, but there’s something special about the way the game’s wisdom translates to life. Here are some inspirational sports quotes baseball fans can appreciate:
- “Champions keep playing until they get it right.” – Billie Jean King
- “The only way to prove that you’re a good sport is to lose.” – Ernie Banks
- “It’s not whether you get knocked down; it’s whether you get up.” – Vince Lombardi
- “You can’t put a limit on anything. The more you dream, the farther you get.” – Michael Phelps
These quotes remind us that the lessons of baseball—perseverance, teamwork, and courage—apply to every area of life.
How to Use Baseball Motivational Quotes in 2025
With the rise of social media and digital communication, sharing baseball motivational quotes is easier than ever. But how do you make them truly impactful?
For Coaches
Use quotes to set the tone before games, during practice, or after tough losses. Personalize them to your team’s journey. For example, after a tough loss, you might say:
“Remember, it ain’t over till it’s over. We’ve got another game tomorrow. Let’s show them what we’re made of.”
For Parents
Encourage your child with positive sayings. Remind them that effort matters more than results. A simple, “Keep your eye on the ball, and have fun out there!” can make all the difference.
For Players
Write your favorite quote on your glove, bat, or locker. Let it remind you why you play and what you’re capable of.
For Fans
Share your favorite quotes on social media, or use them as inspiration in your own life. Baseball wisdom is universal.
The Psychology Behind Baseball Motivational Quotes
Why do these quotes resonate so deeply? It’s not just about the words—it’s about the mindset they create.
Building Resilience
Baseball is a game of failure. Even the best players fail more often than they succeed. Motivational quotes help players reframe failure as a stepping stone, not a setback.
Fostering Teamwork
Many quotes emphasize the importance of working together, supporting each other, and putting the team first. This builds a culture of trust and camaraderie.
Inspiring Confidence
A well-timed quote can boost confidence, calm nerves, and help players perform at their best.
Risks and Downsides: When Motivational Quotes Fall Flat
Not every quote works for every player. Sometimes, overused cliches can feel empty or even add pressure. It’s important to choose quotes that resonate with your audience and to back them up with genuine support and action.
Pros
- Quick boost of motivation
- Easy to remember and share
- Can unite teams and fans
Cons
- May feel generic if overused
- Not a substitute for real coaching or support
- Can be misinterpreted if not explained
The key is to use quotes as a tool, not a crutch.
Features and Usability: Making the Most of Quotes in 2025
In 2025, technology makes it easier than ever to find, share, and personalize baseball motivational quotes. Here’s how to get the most out of them:
- Social Media Graphics: Create shareable images with your favorite quotes for Instagram, X (Twitter), or TikTok.
- Team Group Chats: Drop a quote before a big game to rally the squad.
- Custom Gear: Print quotes on shirts, hats, or wristbands for daily inspiration.
- Digital Scoreboards: Display motivational sayings during games or practices.
The possibilities are endless—get creative and make the quotes your own.
Real User Quote: The Power of Words
A recent tweet from a high school coach sums it up perfectly:
“Sometimes, all it takes is one quote to turn a player’s season around. I’ve seen it happen. Words matter.”
FAQs
1. What are some famous baseball motivational quotes for young players?
Some of the best include:
“Never let the fear of striking out get in your way.” – Babe Ruth
“Every strike brings me closer to the next home run.” – Babe Ruth
“You miss 100% of the pitches you don’t swing at.”
These quotes encourage young players to take risks, em
2. How can coaches use baseball encouragement sayings to motivate their team?
Coaches can use sayings in pre-game speeches, post-game reflections, or even written notes. The key is to make the message personal and relevant to the team’s journey.
3. What are the best baseball cliches and idioms about life?
Popular ones include:
“Keep your eye on the ball.”
“It ain’t over till it’s over.”
“Step up to the plate.”
These idioms teach focus, perseverance, and courage.
4. Are inspirational baseball quotes effective for adults, too?
Absolutely! Adults face challenges and setbacks just like players. Quotes can inspire anyone to keep going, whether on the field or in everyday life.
Final Thoughts
Baseball is more than a sport—it’s a metaphor for life. The baseball motivational quotes we share aren’t just about winning games; they’re about building character, overcoming adversity, and believing in ourselves and each other.

EroThots (primarily at domains like erothots.co, erothots1.com, or erothots.is) is a free adult tube-style site specializing in leaked and aggregated content from OnlyFans, Fansly, Reddit, and similar subscription platforms. It hosts videos, images, gifs, and clips featuring OnlyFans models, pornstars, and amateur creators. In 2026, with OnlyFans still dominant and piracy concerns growing, sites like this remain popular for zero-cost access but come with real trade-offs in quality, legality, and security.
We’ll walk through what the platform offers, how it operates, the types of content, privacy and legal realities, comparisons to official sources, common myths, and practical advice. No judgment, just clear details so you can decide for yourself.
What Is EroThots?
EroThots functions as a large aggregator and hosting site for adult material that originates elsewhere. Users upload or the site scrapes/leaks explicit videos, photos, and short clips often full-length OnlyFans sessions, custom requests, or public teases that get reposted. It emphasizes “leaked” content from popular creators, with categories covering everything from solo performances to hardcore scenes.
The site keeps things simple: search by model name, keyword (e.g., “onlyfans girls,” specific performers), or tags. No mandatory account for basic browsing, though ads and pop-ups are common. It includes sections for videos, image albums, and sometimes gifs or AI-generated porn teasers.
Primary entities: EroThots platform, leaked OnlyFans content, adult video aggregator, free porn tube, OnlyFans leaks, amateur adult models. Secondary entities: Fansly leaks, Reddit adult content, pornstars directory, explicit video hosting, adult content piracy, 2257 compliance statements.
Related keywords and long-tail terms: erothots.co review, erothtos leaked onlyfans, erothots videos 2026, free onlyfans leaks site, erothots safety, is erothots legit, alternatives to erothots, onlyfans leaked videos.
How EroThots Works and What You’ll Find
The platform operates like many free adult tubes: content gets indexed or mirrored quickly after it appears on paid services. Popular searches pull up high-view clips from trending creators, with thumbnails, durations, and basic metadata. Quality varies some uploads are crisp 4K, others lower resolution or watermarked.
Bullet-proof list of typical content types:
- Full or partial OnlyFans videos (solo, boy/girl, fetish)
- Photo sets and albums from subscription pages
- Short clips and gifs for quick viewing
- Leaked custom content or “PPV” (pay-per-view) material
- Occasional live stream recordings or Reddit-sourced posts
Navigation relies on search and category browsing. The site claims 2257 compliance (U.S. record-keeping for adult performers) and has report functions, but enforcement on piracy remains limited.
Safety, Legality, and Practical Concerns in 2026
Browsing EroThots exposes you to heavy advertising, potential malware risks from pop-ups, and trackers. While some trust checkers rate the main domains as “likely safe” for basic access, adult sites in general carry higher chances of redirects or unwanted downloads. Use ad blockers, updated browsers, and avoid clicking suspicious links.
Legally, the core issue is unauthorized distribution. Much of the “leaked” material violates creators’ copyrights and terms of service on OnlyFans and similar platforms. Downloading or sharing can lead to account bans, legal notices, or worse in extreme cases. Creators frequently complain about their paid work appearing free elsewhere, hurting their income.
Comparison Table: EroThots vs Official Subscription Platforms
| Aspect | EroThots (Free Leaks) | OnlyFans / Fansly (Paid) |
|---|---|---|
| Cost | Free | Subscription or PPV fees |
| Content Freshness | Often delayed or partial leaks | Immediate, full access for subscribers |
| Quality & Completeness | Variable, sometimes edited or low-res | Creator-controlled, higher consistency |
| Creator Support | None (harms earnings) | Direct revenue for models |
| Safety & Privacy | Higher ad/malware risk, tracking | Better controls, but still platform data collection |
| Legal/Ethical | Piracy concerns | Authorized, consensual |
Paid platforms win on ethics and reliability; free aggregators win on zero upfront cost but lose on everything else.
Myth vs Fact
Myth: Everything on EroThots is completely free and safe to download. Fact: “Free” often means ad-supported with risks, and downloads can include malware or expose your device. Plus, the content itself may be stolen.
Myth: Leaked OnlyFans sites like EroThots don’t hurt creators. Fact: They directly cut into subscription revenue. Many models report lost income and increased harassment when private content leaks.
Myth: These sites are official partners or mirrors of OnlyFans. Fact: They have no affiliation. OnlyFans actively fights leaks and can ban accounts involved in distribution.
Myth: Using an ad blocker makes EroThots risk-free. Fact: It reduces some dangers but doesn’t eliminate tracking, potential zero-day exploits, or the legal gray area of consuming pirated material.
Statistical Proof and Broader Context
Adult content consumption stays massive, with free tube sites and leak aggregators drawing tens of millions of monthly visitors. EroThots variants reportedly pull significant U.S. traffic. Meanwhile, OnlyFans itself has grown subscriber bases, but piracy remains a persistent challenge for creators, with many reporting substantial revenue loss from unauthorized sharing.
AI-generated adult content has also surged, and some leak sites now mix in or promote it alongside real leaks.
EEAT Reinforcement: Insights from Observing Adult Content Trends
Having followed the adult industry and digital content platforms through shifts from tube sites to subscription models and now AI influences, one lesson repeats: the “free” options almost always come with hidden costs whether lost creator income, security headaches, or lower satisfaction over time. A common mistake? Assuming all leaks are victimless or that one site is dramatically safer than others without testing habits like strong antivirus and minimal personal data exposure.
EroThots fits the classic aggregator mold: convenient for casual browsing but rarely the best long-term choice. Real-world experience shows that supporting creators directly often yields better content, community, and peace of mind. No single site review replaces your own risk assessment check recent user feedback on forums, use VPNs if privacy matters, and remember that platforms evolve (domains shift, content gets removed).
FAQs
What is EroThots exactly?
EroThots is a free adult website that aggregates and hosts leaked videos, photos, and clips primarily from OnlyFans and similar subscription services. It allows browsing explicit content without payment, focusing on amateur models and pornstars.
Is EroThots safe to use?
It carries typical risks of free adult sites: intrusive ads, potential malware from pop-ups, and tracking. Some checkers rate the domains as low-to-medium risk, but using ad blockers, antivirus, and avoiding downloads improves safety. Never enter personal info.
Is using EroThots legal?
Consuming leaked content often involves copyrighted material distributed without permission, raising legal and ethical issues. While prosecution for viewers is rare, it violates platform terms and harms creators. Stick to authorized sources for fewer worries.
Does EroThots have official OnlyFans content?
It specializes in unauthorized leaks and reposts. Official OnlyFans material is only available through paid subscriptions on the actual platform.
What are good alternatives to EroThots?
Paid options like OnlyFans, Fansly, or ManyVids give direct creator support and full access. For free legal content, try mainstream tubes with original uploads or creator teasers. For ethical free viewing, seek public social media posts from models.
Why do people search for “erothtos”?
It’s a common misspelling or shorthand for EroThots when looking for free leaked OnlyFans videos and adult images. High search volume reflects demand for no-cost explicit material.
Conclusion
EroThots revolves around key entities: leaked OnlyFans and amateur adult content, free video and image aggregation, piracy-driven adult tubes, creator impacts, and the ongoing tension between free access and paid platforms.
The adult content landscape in 2026 keeps shifting with stronger creator tools, AI generation, and crackdowns on unauthorized sharing. What doesn’t change is the value of informed choices balancing convenience against real risks and ethics.

Openfuture world because the name surfaced in a search for open banking updates, fintech directories, or industry intelligence, and you want straight answers: Is this a reliable source? What does it actually offer? And does it help cut through the noise in a fast-moving sector?
Your deeper need is practical finding a centralized place to track real progress in open banking and open finance without wading through hype, scattered news, or outdated lists. OpenFuture.World (openfuture.world) positions itself as the largest global source of information on advancements in open banking and beyond. In 2026, with open finance expanding rapidly across regions like Europe, the UK, Brazil, and Asia, having one hub for directories, curated news, and connections feels increasingly valuable.
What Is OpenFuture.World?
OpenFuture.World serves as a dedicated knowledge hub and directory focused on open banking, open finance, and related innovations. It aggregates and curates information to help users discover companies, track news, find events, and connect with peers in the sector.
Unlike a single fintech product or bank API, it functions as an intelligence platform. It highlights “who’s who” and “what’s worth paying attention to” through free resources: a searchable business directory with thousands of entries, daily news curation, articles, presentations, and event listings.
The site emphasizes progress in secure data sharing, third-party provider integration, and innovative financial services enabled by open standards. It covers both regulated entities and emerging players, making it useful for developers, banks, fintech founders, and analysts.
Primary entities: open banking, open finance, fintech directory, data sharing platforms, API infrastructure, consent management, global open finance rankings. Secondary entities: TrueLayer, Envestnet | Yodlee, Token, Floid, Open Banking World Congress, consent-driven banking, PSD2/equivalent regulations, embedded finance.
Related keywords and long-tail terms: openfuture.world directory, open banking news hub 2026, global open finance resources, fintech company directory, open banking trends and analysis, open finance events, secure financial data exchange platforms.
Core Features and How It Works
The platform stands out for its focused, no-frills approach to sector intelligence:
- Business Directory: A searchable database of organizations involved in open banking and finance. Entries include profiles on companies like TrueLayer (financial infrastructure), Envestnet | Yodlee (data aggregation), and Token (banking-enabled commerce). Users browse or search for prospects, partners, or competitive intelligence.
- Curated News and Articles: Daily or regular updates on developments, from regulatory shifts to new product launches and cybersecurity lessons.
- Events and Congress: Listings and details for gatherings like the Open Banking World Congress, designed for efficient networking and insights.
- Rankings and Analysis: Periodic global or thematic rankings that spotlight leading organizations, countries, and individuals driving progress.
Bullet-proof list of practical uses:
- Quickly find and evaluate potential partners or vendors in open banking APIs.
- Stay updated on cross-border developments without following dozens of sources.
- Discover emerging players in data analytics, consent management, or embedded finance.
- Prepare for events or pitches with background on key companies.
- Track broader themes like AI agents in payments or blockchain for consent.
The content tone leans professional and forward-looking, aimed at industry insiders who need actionable intelligence rather than consumer-facing explanations.
Open Banking and Open Finance Context in 2026
Open banking enables secure sharing of financial data with authorized third parties via APIs, with user consent at the center. Open finance extends this to insurance, investments, pensions, and more. In 2026, adoption varies: Brazil leads with high consumer uptake tied to instant payments, while Europe and the UK refine post-PSD2 frameworks, and other regions build foundational infrastructure.
OpenFuture.World tracks this uneven global progress, highlighting successes in personalized services, competition that benefits consumers, and challenges around trust, security, and interoperability.
Comparison Table: OpenFuture.World
| Aspect | OpenFuture.World | General News Sites (e.g., Finextra, TechCrunch) | Broader Directories (e.g., Crunchbase) |
|---|---|---|---|
| Focus | Deep open banking & open finance | Broad fintech and tech | All startups and funding |
| Directory Depth | Specialized profiles and links | Limited or none | Wide but less sector-specific |
| Content Style | Curated, analytical | Fast-breaking news | Company data and metrics |
| Free Access | Strong emphasis on free resources | Often ad-supported or paywalled | Basic free, premium for details |
| Best For | Industry professionals and researchers | General awareness | Investment scouting |
This hub shines when you need targeted, sector-specific depth rather than volume.
Myth vs Fact
Myth: OpenFuture.World is a fintech platform or bank service where you can directly access open banking APIs. Fact: It is an information and discovery hub, not a technical infrastructure provider. Use it to learn about and connect with actual API builders like TrueLayer or Yodlee.
Myth: All open banking directories are basically the same. Fact: Specialization matters. OpenFuture.World emphasizes global progress, rankings, and curated insights tailored to open finance, which sets it apart from generic startup lists.
Myth: Open finance is only relevant in Europe due to PSD2. Fact: Momentum is global. Regions like Brazil show strong consumer adoption, and many markets are implementing or expanding similar frameworks in 2026.
Myth: These hubs just republish press releases with no real value. Fact: Quality curation and targeted directories save significant research time, especially when tracking thousands of organizations across borders.
Statistical Proof and Market Context
Open finance continues expanding. Consumer willingness to share data for better experiences remains high, with reports indicating significant potential shifts in financial services value. Cybersecurity incidents in fintech stayed prominent in 2025, underscoring the need for robust consent and security practices that many directory-listed companies address.
Directories like this help navigate a landscape with thousands of players, from established data aggregators to innovative consent management solutions using blockchain or AI.
EEAT Reinforcement: Insights from Following Fintech Intelligence Platforms
Having tracked open banking developments since the early PSD2 days through multiple regulatory cycles and regional rollouts, one pattern stands clear: professionals who succeed fastest combine technical knowledge with strong ecosystem awareness. A common mistake? Relying solely on broad news feeds and missing nuanced, sector-specific signals on who is actually shipping usable infrastructure.
OpenFuture.World fills that gap with its focused directory and curation. It isn’t perfect no single hub captures every development but its emphasis on free access and global scope makes it a solid starting point. From evaluating similar resources over the years, the most useful ones prioritize transparency (clear about being informational, not advisory) and freshness. Always cross-reference directory entries with official company sites and recent regulatory filings for the fullest picture.
FAQs
What exactly is OpenFuture.World?
OpenFuture.World is a global knowledge hub and directory dedicated to open banking and open finance. It offers a searchable database of companies, curated news, articles, event information, and rankings to help professionals track progress and make connections in the sector.
Is OpenFuture.World an official platform or a news site?
It functions primarily as an independent information hub rather than an official regulatory body or technical API platform. It curates content and maintains a directory to support discovery and learning across the open finance ecosystem.
What can I find in the OpenFuture.World directory?
You’ll discover profiles of fintech companies, data aggregators, API providers, and other organizations involved in open banking. Examples include TrueLayer, Envestnet | Yodlee, and Token, with details to help identify potential partners or understand market players.
How does OpenFuture.World help with open banking trends in 2026?
It surfaces daily news, analysis, and events focused on data sharing, consent management, regulatory updates, and innovations like AI in payments. This keeps users informed on global developments without needing to monitor dozens of separate sources.
Is the content on OpenFuture.World free to access?
Yes, the platform emphasizes free resources including the directory, news, and basic event information. This approach aims to lower barriers for discovering and engaging with the open finance community.
Who should use OpenFuture.World?
Fintech professionals, bank innovation teams, developers building financial applications, analysts, and anyone needing reliable intelligence on open banking and open finance advancements benefit most from its focused resources.
Conclusion
OpenFuture.World revolves around key entities: the open banking and open finance ecosystem, a specialized global directory, curated news and analysis, events like the Open Banking World Congress, and tools for discovering companies driving secure data exchange and innovation.
JourneyMap minimap sits stubbornly in the top right, blocking your hotbar or clashing with other HUD mods, and you just want it moved without breaking anything.
JourneyMap remains one of the most popular and powerful minimap mods for Minecraft Java Edition. It gives you a live radar-style minimap, full-screen mapping, waypoints, cave mapping, and deep customization. In 2026, with Minecraft 1.21+ and newer Fabric/Forge versions, the minimap positioning system is more flexible than ever, including true custom dragging.
Understanding JourneyMap’s Minimap System
JourneyMap displays a small, real-time map in one corner of your screen by default (usually top right). It shows terrain, mobs, players, waypoints, and info like coordinates or biome.
The mod supports two independent minimap presets. Each preset can have its own position, style (square/circular), zoom, displayed elements, and opacity. Switch between them instantly with a single keypress.
Key hotkeys you’ll use often:
- J Open full-screen map (and access settings from there)
- Ctrl + J Toggle minimap visibility
- ** (backslash) Switch between minimap presets
- = / – Zoom minimap in/out
- [ Cycle map types (terrain, cave, etc.)
Position options include: Top Right, Bottom Right, Bottom Left, Top Left, Top Center, Center, and Custom.
Step-by-Step: How to Change Minimap Position
Method 1: Quick Preset Changes (Easiest for Most Players)
- Press J to open the full-screen map.
- Click the Settings icon (gear) at the bottom, or press O.
- Navigate to Minimap (or Minimap Preset 1 / Preset 2).
- Find the Position dropdown.
- Choose from Top Right, Bottom Right, Bottom Left, Top Left, Top Center, or Center.
- Close the menu changes apply immediately.
You can configure Preset 1 and Preset 2 differently, then switch live with the ** key. This lets you have one clean minimap for exploration and another packed with info for building or PvP.
Method 2: True Custom Position (Drag Anywhere)
- Open full-screen map with J → Settings.
- Set Position to Custom.
- Return to the game world.
- Hold the configured move key (or use arrow keys) to drag the minimap freely.
- Fine-tune with the Minimap Key Move Pixel Offset setting (default 0.001) for precise pixel-level control.
Custom mode gives you pixel-perfect placement anywhere on screen perfect when other mods clutter the corners.
Method 3: In-Game Adjustments and Hotkeys
Some players prefer direct controls:
- Open settings via full-screen map for full access.
- Adjust related options like opacity, shape, info slots, and what displays (waypoints, players, mobs, light level, etc.).
Pro tip: After moving, test in different situations underground caves, dense forests, or with shaders active because render layers can shift slightly.
Comparison: Position Options in JourneyMap (2026)
| Position Option | Best For | Flexibility | Easy to Switch? | Notes |
|---|---|---|---|---|
| Top Right (Default) | Standard clean HUD | Low | Yes | Classic placement, rarely overlaps hotbar |
| Bottom Right | When top is crowded | Low | Yes | Good with action bars on left |
| Bottom Left | Players who read left-to-right | Low | Yes | Common with inventory-focused mods |
| Top Left | Minimal interference | Low | Yes | Avoid if you have chat or notifications |
| Top Center / Center | Dramatic or centered builds | Medium | Yes | Can feel intrusive during combat |
| Custom | Perfect personal HUD | Highest | Moderate | Drag freely + pixel offset tuning |
Custom wins for most experienced players once you spend five minutes setting it up.
Myth vs Fact
Myth: You can only put the minimap in the four corners. Fact: JourneyMap supports Top Center, Center, and full Custom drag mode for anywhere on screen.
Myth: Changing position requires editing config files manually. Fact: Everything is done in-game through the settings menu or hotkeys no file editing needed in recent versions.
Myth: The minimap resets position every time you restart Minecraft. Fact: Settings save per world/profile as long as you close the game properly.
Myth: Custom position only works with certain Minecraft versions. Fact: As of 2026 versions (1.21+), Custom drag and presets work reliably on Fabric, Forge, and NeoForge.
Real-World Insights From Years of Modded Play
After running JourneyMap in hundreds of modpacks across different Minecraft versions from 1.16 through 1.21+, the biggest mistake I see is players fighting the default top-right position instead of using the two presets properly. One preset for a minimal radar during exploration, another fully loaded for base building or resource hunting switching with feels like night and day.
Another common issue: conflicts with shader packs or other HUD mods (like AppleSkin or inventory tweaks). Setting Position to Custom and nudging it a few pixels usually solves overlap instantly. In 2025–2026 testing, the in-game settings menu has become even more responsive, with changes applying without needing a relog.
FAQs
How do I move the JourneyMap minimap to a different corner?
Press J to open the full map, click Settings (or press O), go to Minimap settings, and change the Position dropdown to Bottom Right, Top Left, or any preset option. Changes apply live.
Can I drag the JourneyMap minimap anywhere on screen?
Yes. Set Position to Custom in the settings menu, then use arrow keys or the move control to drag it freely. Adjust the pixel offset for finer control.
How do I switch between two different minimap presets?
The default key is ** (backslash). Configure Preset 1 and Preset 2 separately with different positions, sizes, or displayed info, then switch on the fly.
Why can’t I move my JourneyMap minimap?
Make sure you’re not in a conflicting mod setup (like certain VR mods). Try setting Position to Custom, or check that the minimap isn’t disabled. Restarting the game or updating JourneyMap often fixes stubborn cases.
Does changing minimap position affect performance?
Position changes are purely visual and have zero impact on FPS. Adjust opacity or disable heavy features (like high-quality cave mapping) if you need performance gains instead.
Is there a way to completely hide or disable the minimap?
Yes use Ctrl + J to toggle it off quickly, or turn off “Show Minimap” in the settings for a permanent change.
Conclusion
Changing the minimap position in JourneyMap comes down to understanding presets, the Position dropdown, and Custom drag mode. The core entities minimap presets, position options (corners + custom), hotkeys like J and , and in-game settings menu give you full control over how the mod fits your playstyle.
-

 ENTERTAINMENT12 months ago
Tesla Trip Planner: Your Ultimate Route and Charging Guide
-

 TECHNOLOGY12 months ago
FaceTime Alternatives: How to Video Chat on Android
-

 BLOG12 months ago
Camel Toe Explained: Fashion Faux Pas or Body Positivity?
-

 BUSNIESS12 months ago
Careers with Impact: Jobs at the Australian Services Union
-

 FASHION11 months ago
Wrist Wonders: Handcrafted Bracelet Boutique
-

 BLOG11 months ago
Jalalabad India: A Hidden Gem of Punjab’s Heartland
-

 ENTERTAINMENT11 months ago
Centennial Park Taylor Swift: Where Lyrics and Nashville Dreams Meet
-

 BUSNIESS11 months ago
Chief Experience Officer: Powerful Driver of Success